Cleaning
WASHING THE EXTERIOR
Wash your vehicle regularly with cool or lukewarm water and a neutral Ph shampoo, such as Motorcraft Detail Wash (ZC-3-A), which is available from your dealer.
- Never use strong household detergents or soap, such as dish washing or laundry liquid. These products can discolor and spot painted surfaces.
- Never wash a vehicle that is “hot to the touch” or during exposure to strong, direct sunlight.
- Always use a clean sponge or car wash mitt with plenty of water for best results.
- Dry the vehicle with a chamois or soft terry cloth towel in order to eliminate water spotting.
- It is especially important to wash the vehicle regularly during the winter months, as dirt and road salt are difficult to remove and cause damage to the vehicle.
- Immediately remove items such as gasoline, diesel fuel, bird droppings and insect deposits because they can cause damage to the vehicle’s paintwork and trim over time.
- Remove any exterior accessories, such as antennas, before entering a car wash.
- Suntan lotions and insect repellents can damage any painted surface; if these substances come in contact with your vehicle, wash off as soon as possible.
- If your vehicle is equipped with running boards, do not use rubber, plastic and vinyl protectant products on the running board surface, as the area may become slippery.
WAXING
Applying a polymer paint sealant to your vehicle every six months will assist in reducing minor scratches and paint damage.
- Wash the vehicle first.
- Do not use waxes that contain abrasives.
- Do not allow paint sealant to come in contact with any non-body (low-gloss black) colored trim, such as grained door handles, roof racks, bumpers, side moldings, mirror housings or the windshield cowl area. The paint sealant will “gray” or stain the parts over time.
224
Cleaning
PAINT CHIPS
Your dealer has touch-up paint and sprays to match your vehicle’s color. Take your color code (printed on a sticker in the driver’s door jam) to your dealer to ensure you get the correct color.
- Remove particles such as bird droppings, tree sap, insect deposits, tar spots, road salt and industrial fallout before repairing paint chips.
- Always read the instructions before using the products.
ALUMINUM WHEELS AND WHEEL COVERS
Aluminum wheels and wheel covers are coated with a clearcoat paint finish. In order to maintain their shine:
- Clean weekly with Motorcraft Wheel and Tire Cleaner (ZC-37–A), which is available from your dealer. Heavy dirt and brake dust accumulation may require agitation with a sponge. Rinse thoroughly with a strong stream of water.
- Never apply any cleaning chemical to hot or warm wheel rims or covers.
- Some automatic car washes may cause damage to the finish on your wheel rims or covers. Chemical-strength cleaners, or cleaning chemicals, in combination with brush agitation to remove brake dust and dirt, could wear away the clearcoat finish over time.
- Do not use hydrofluoric acid-based or high caustic-based wheel cleaners, steel wool, fuels or strong household detergent.
- To remove tar and grease, use Motorcraft Bug and Tar Remover (ZC-42), available from your dealer.
ENGINE
Engines are more efficient when they are clean because grease and dirt buildup keep the engine warmer than normal. When washing:
- Take care when using a power washer to clean the engine. The high-pressure fluid could penetrate the sealed parts and cause damage.
- Do not spray a hot engine with cold water to avoid cracking the engine block or other engine components.
- Spray Motorcraft Engine Shampoo and Degreaser (ZC-20) on all parts that require cleaning and pressure rinse clean.
- Cover the highlighted areas to prevent water damage when cleaning the engine.
225
Cleaning
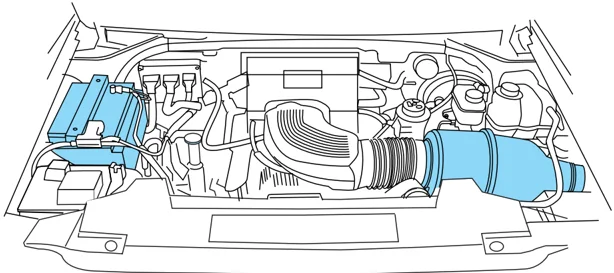
• 4.6L engine
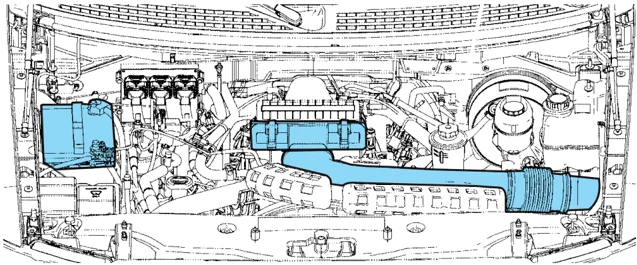
• 5.4L engine
• Never wash or rinse the engine while it is running; water in the running engine may cause internal damage.
PLASTIC (NON-PAINTED) EXTERIOR PARTS
Use only approved products to clean plastic parts. These products are available from your dealer.
• For routine cleaning, use Motorcraft Detail Wash (ZC-3-A).
• If tar or grease spots are present, use Motorcraft Bug and Tar Remover (ZC-42).
226
Cleaning
WINDOWS AND WIPER BLADES
The windshield, rear and side windows and the wiper blades should be cleaned regularly. If the wipers do not wipe properly, substances on the vehicle's glass or the wiper blades may be the cause. These may include hot wax treatments used by commercial car washes, tree sap, or other organic contamination. To clean these items, please follow these tips:
- The windshield, rear windows and side windows may be cleaned with a non-abrasive cleaner such as Motorcraft Ultra Clear Spray Glass Cleaner (ZC-23), available from your dealer.
- Do not use abrasives, as they may cause scratches.
- Do not use fuel, kerosene, or paint thinner to clean any parts.
- Wiper blades can be cleaned with isopropyl (rubbing) alcohol or windshield washer solution. Be sure to replace wiper blades when they appear worn or do not function properly.
Do not use sharp objects, such as a razor blade, to clean the inside of the rear window or to remove decals, as it may cause damage to the rear window defroster's heated grid lines (if equipped).
INSTRUMENT PANEL AND CLUSTER LENS
Clean the instrument panel with a damp cloth, then dry with a dry cloth.
- Avoid cleaners or polish that increase the gloss of the upper portion of the instrument panel. The dull finish in this area helps protect the driver from undesirable windshield reflection.

- Be certain to wash or wipe your hands clean if you have been in contact with certain products such as insect repellent and suntan lotion in order to avoid possible damage to the interior painted surfaces.
INTERIOR TRIM
- Clean the interior trim areas with a damp cloth, then dry by wiping with a dry, soft, clean cloth.
- Do not use household or glass cleaners as these may damage the finish.
227
Cleaning
I NTERIOR
For fabric, carpets, cloth seats and safety belts:
• Remove dust and loose dirt with a vacuum cleaner.
• Remove light stains and soil with Motorcraft Extra Strength Upholstery Cleaner (ZC-41).
• If grease or tar is present on the material, spot-clean the area first with Motorcraft Spot and Stain Remover (ZC-14).
• Never saturate the seat covers with cleaning solution.
• Do not use household cleaning products or glass cleaners, which can stain and discolor the fabric and affect the flame retardant abilities of the seat materials.
Do not use cleaning solvents, bleach or dye on the vehicle’s seatbelts, as these actions may weaken the belt webbing.
LEATHER SEATS (IF EQUIPPED)
Your leather seating surfaces have a clear, protective coating over the leather.
• To clean, use a soft cloth with Motorcraft Deluxe Leather and Vinyl Cleaner (ZC-11-A). Dry the area with a soft cloth.
• To help maintain its resiliency and color, use the Motorcraft Deluxe Leather Care Kit (ZC-11-D), available from your authorized dealer.
• Do not use household cleaning products, alcohol solutions, solvents or cleaners intended for rubber, vinyl and plastics, or oil/petroleum-based leather conditioners. These products may cause premature wearing of the clear, protective coating.
Note: In some instances, color or dye transfer can occur when wet clothing comes in contact with leather upholstery. If this occurs, the leather should be cleaned immediately to avoid permanent staining.
U NDERBODY
Flush the complete underside of your vehicle frequently. Keep body and door drain holes free from packed dirt.
228
Cleaning
FORD, LINCOLN AND MERCURY CAR CARE PRODUCTS
Your Ford, Lincoln or Mercury dealer has many quality products available to clean your vehicle and protect its finishes. These quality products have been specifically engineered to fulfill your automotive needs; they are custom designed to complement the style and appearance of your vehicle. Each product is made from high quality materials that meet or exceed rigid specifications. For best results, use the following products or products of equivalent quality:
- Motorcraft Custom Clearcoat Polish (ZC-8-A)
- Motorcraft Custom Vinyl Protectant (not available in Canada) (ZC-40-A)
- Motorcraft Vinyl Cleaner (Canada only) (CXC-93)
- Motorcraft Vinyl Conditioner (Canada only) (CXC-94)
- Motorcraft Deluxe Leather and Vinyl Cleaner (not available in Canada) (ZC-11-A)
- Motorcraft Bug and Tar Remover (ZC-42)
- Motorcraft Extra Strength Upholstery Cleaner (not available in Canada) (ZC-41)
- Motorcraft Custom Bright Metal Cleaner (ZC-15)
- Motorcraft Wheel and Tire Cleaner (ZC-37-A)
- Motorcraft Dash and Vinyl Cleaner (ZC-38-A)
- Motorcraft Car Care Kit (ZC-26)
- Motorcraft Premium Car Wash Concentrate (ZC-17-B)
- Motorcraft Carlite Glass Cleaner (Canada only) (CXC-100)
- Motorcraft Spot and Stain Remover (ZC-14)
- Motorcraft Detail Wash (ZC-3-A)
- Motorcraft Tire Clean and Shine (ZC-28)
- Motorcraft Triple Clean (ZC-13)
- Motorcraft Ultra-Clear Spray Glass Cleaner (not available in Canada) (ZC-23)
- Motorcraft Engine Shampoo and Degreaser (ZC-20)
229
Maintenance and Specifications
SERVICE RECOMMENDATIONS
To help you service your vehicle:
- We highlight do-it-yourself items in the engine compartment for easy location.
- We provide a scheduled maintenance guide which makes tracking routine service easy.
If your vehicle requires professional service, your dealership can provide the necessary parts and service. Check your Warranty Guide/Owner Information Guide to find out which parts and services are covered.
Use only recommended fuels, lubricants, fluids and service parts conforming to specifications. Motorcraft parts are designed and built to provide the best performance in your vehicle.
PRECAUTIONS WHEN SERVICING YOUR VEHICLE
- Do not work on a hot engine.
- Make sure that nothing gets caught in moving parts.
- Do not work on a vehicle with the engine running in an enclosed space, unless you are sure you have enough ventilation.
- Keep all open flames and other burning (cigarettes) material away from the battery and all fuel related parts.
Working with the engine off
- Automatic transmission:
- Set the parking brake and shift to P (Park).
- Turn off the engine and remove the key.
- Block the wheels.
- Manual transmission:
- Set the parking brake, depress the clutch and place the gearshift in 1 (First).
- Turn off the engine and remove the key.
- Block the wheels.
Working with the engine on
- Automatic transmission:
- Set the parking brake and shift to P (Park).
- Block the wheels.
230
Maintenance and Specifications
- Manual transmission:
- Set the parking brake, depress the clutch and place the gearshift in N (Neutral).
- Block the wheels.
Note: Do not start your engine with the air cleaner removed and do not remove it while the engine is running.
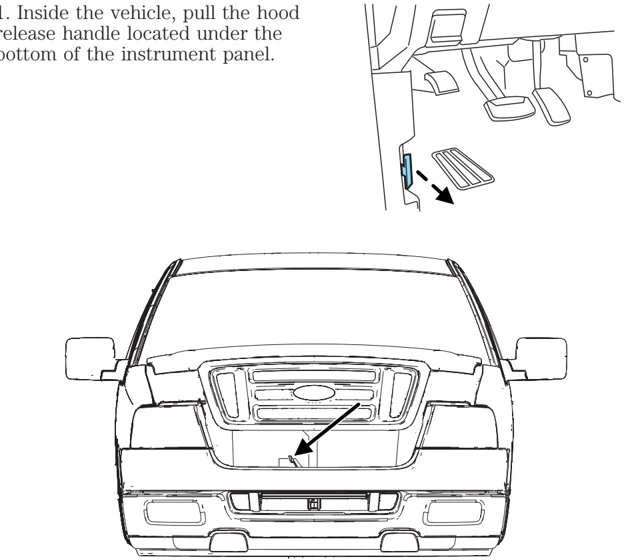
OPENING THE HOOD
- Inside the vehicle, pull the hood release handle located under the bottom of the instrument panel.

- Go to the front of the vehicle and release the auxiliary latch that is located on the front bumper under the grill.
- Lift the hood until the lift cylinders hold it open.
231
Maintenance and Specifications
IDENTIFYING COMPONENTS IN THE ENGINE COMPARTMENT
4.6L V8
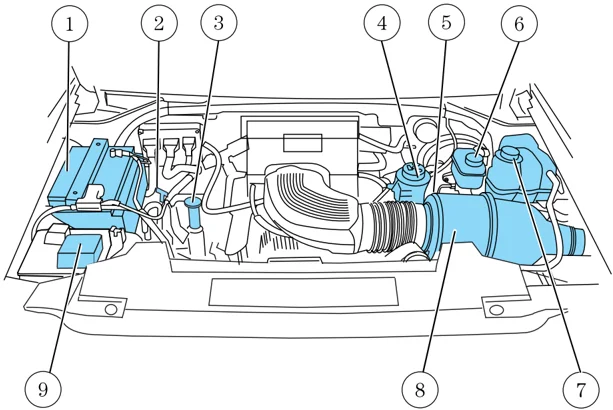
- Battery
- Transmission fluid dipstick (automatic transmission)
- Engine oil filler cap
- Power steering fluid reservoir
- Engine oil dipstick
- Brake fluid reservoir
- Engine coolant reservoir
- Air filter assembly
- Windshield washer fluid reservoir
232
Maintenance and Specifications
5.4L V8
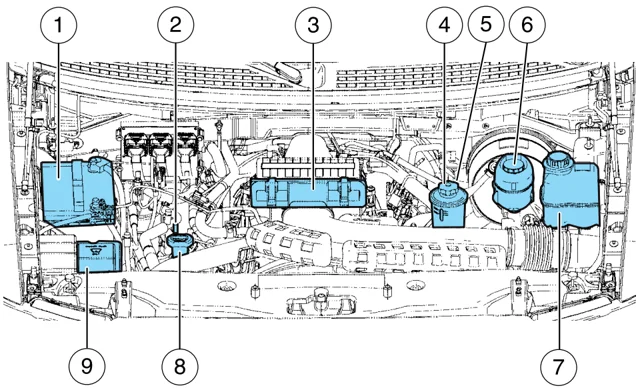
- Battery
- Transmission fluid dipstick (automatic transmission)
- Air filter assembly
- Power steering fluid reservoir
- Engine oil dipstick
- Brake fluid reservoir
- Engine coolant reservoir
- Engine oil filler cap
- Windshield washer fluid reservoir
Maintenance and Specifications
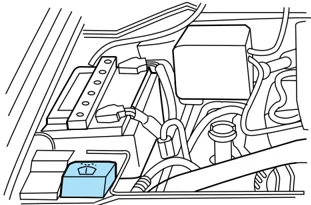
WINDSHIELD WASHER FLUID
Add fluid to fill the reservoir if the level is low. In very cold weather, do not fill the reservoir completely.
Only use a washer fluid that meets Ford specification WSB-M8B16–A2. Refer to Lubricant specifications in this chapter.

State or local regulations on volatile organic compounds may restrict the use of methanol, a common windshield washer antifreeze additive. Washer fluids containing non-methanol antifreeze agents should be used only if they provide cold weather protection without damaging the vehicle’s paint finish, wiper blades or washer system.
If you operate your vehicle in temperatures below 40° F (4.5°C), use washer fluid with antifreeze protection. Failure to use washer fluid with antifreeze protection in cold weather could result in impaired windshield vision and increase the risk of injury or accident.
Note: Do not put washer fluid in the engine coolant reservoir. Washer fluid placed in the cooling system may harm engine and cooling system components.
ENGINE OIL
Checking the engine oil
Refer to the scheduled maintenance guide for the appropriate intervals for checking the engine oil.
- Make sure the vehicle is on level ground.
- Turn the engine off and wait a few minutes for the oil to drain into the oil pan.
- Set the parking brake and ensure the gearshift is securely latched in P (Park) (automatic transmission) or 1 (First) (manual transmission).
- Open the hood. Protect yourself from engine heat.
234
Maintenance and Specifications
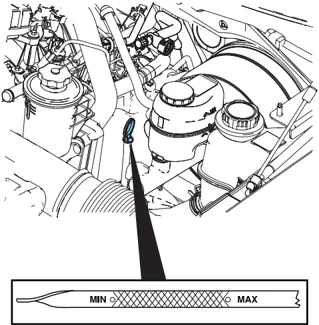
• 4.6L/5.4L V8 engine
MIN MAX
- Locate and carefully remove the engine oil level indicator (dipstick).
- Wipe the indicator clean. Insert the indicator fully, then remove it again.
- If the oil level is between the MIN and MAX marks, the oil level is acceptable. DO NOT ADD OIL.
- If the oil level is below the MIN mark, add enough oil to raise the level within the MIN-MAX range.
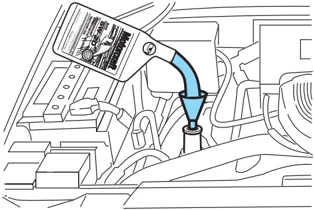
- Oil levels above the MAX mark may cause engine damage. Some oil must be removed from the engine by a service technician.
- Put the indicator back in and ensure it is fully seated.
Adding engine oil
- Check the engine oil. For instructions, refer to Checking the engine oil in this chapter.
235
Maintenance and Specifications
- If the engine oil level is not within the normal range, add only certified engine oil of the recommended viscosity. Remove the engine oil filler cap and use a funnel to pour the engine oil into the opening.
- Recheck the engine oil level. Make sure the oil level is not above the MAX mark on the engine oil level indicator (dipstick).
- Install the indicator and ensure it is fully seated.
- Fully install the engine oil filler cap by turning the filler cap clockwise 1/4 of a turn until three clicks are heard or until the cap is fully seated.
To avoid possible oil loss, DO NOT operate the vehicle with the engine oil level indicator and/or the engine oil filler cap removed.
Engine oil and filter recommendations
Look for this certification trademark.
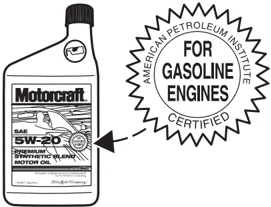
Use SAE 5W-20 engine oil.
Only use oils “Certified For Gasoline Engines” by the American Petroleum Institute (API). To protect your engine’s warranty use Motorcraft SAE 5W-20 or an equivalent 5W-20 oil meeting Ford specification WSS-M2C153-H. SAE 5W-20 oil provides optimum fuel economy and durability performance meeting all requirements for your vehicle’s engine.
Do not use supplemental engine oil additives, cleaners or other engine treatments. They are unnecessary and could lead to engine damage that is not covered by Ford warranty.
Change your engine oil and filter according to the appropriate schedule listed in the scheduled maintenance guide.
Ford production and aftermarket (Motorcraft) oil filters are designed for added engine protection and long life. If a replacement oil filter is used that does not meet Ford material and design specifications, start-up engine noises or knock may be experienced.
236
Maintenance and Specifications
It is recommended you use the appropriate Motorcraft oil filter (or another brand meeting Ford specifications) for your engine application.
BATTERY
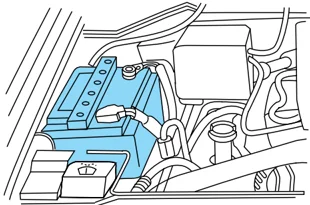
Your vehicle is equipped with a Motorcraft maintenance-free battery which normally does not require additional water during its life of service.

If your battery has a cover/shield, make sure it is reinstalled after the battery has been cleaned or replaced.
For longer, trouble-free operation, keep the top of the battery clean and dry. Also, make certain the battery cables are always tightly fastened to the battery terminals.
If you see any corrosion on the battery or terminals, remove the cables from the terminals and clean with a wire brush. You can neutralize the acid with a solution of baking soda and water.
Note: Electrical or electronic accessories or components added to the vehicle by the dealer or the owner may adversely affect battery performance and durability.
Batteries normally produce explosive gases which can cause personal injury. Therefore, do not allow flames, sparks or lighted substances to come near the battery. When working near the battery, always shield your face and protect your eyes. Always provide proper ventilation.
When lifting a plastic-cased battery, excessive pressure on the end walls could cause acid to flow through the vent caps, resulting in personal injury and/or damage to the vehicle or battery. Lift the battery with a battery carrier or with your hands on opposite corners.
237
Maintenance and Specifications
! Keep batteries out of reach of children. Batteries contain sulfuric acid. Avoid contact with skin, eyes or clothing. Shield your eyes when working near the battery to protect against possible splashing of acid solution. In case of acid contact with skin or eyes, flush immediately with water for a minimum of 15 minutes and get prompt medical attention. If acid is swallowed, call a physician immediately.
! Battery posts, terminals and related accessories contain lead and lead compounds. Wash hands after handling.
Because your vehicle’s engine is also electronically controlled by a computer, some control conditions are maintained by power from the battery. When the battery is disconnected or a new battery is installed, the engine must relearn its idle and fuel trim strategy for optimum driveability and performance. To begin this process:
- With the vehicle at a complete stop, set the parking brake.
- Put the gearshift in P (Park) (automatic transmission) or the neutral position (manual transmission), turn off all accessories and start the engine.
- Run the engine until it reaches normal operating temperature.
- Allow the engine to idle for at least one minute.
- Turn the A/C on and allow the engine to idle for at least one minute.
- Drive the vehicle to complete the relearning process.
- The vehicle may need to be driven 10 miles (16 km) or more to relearn the idle and fuel trim strategy.
- If you do not allow the engine to relearn its idle trim, the idle quality of your vehicle may be adversely affected until the idle trim is eventually relearned.
If the battery has been disconnected or a new battery has been installed, the clock and the preset radio stations must be reset once the battery is reconnected.
238
Maintenance and Specifications
- Always dispose of automotive batteries in a responsible manner. Follow your local authorized standards for disposal. Call your local authorized recycling center to find out more about recycling automotive batteries.
ENGINE COOLANT
Checking engine coolant
The concentration and level of engine coolant should be checked at the mileage intervals listed in the Scheduled Maintenance Guide. The coolant concentration should be maintained at 50/50 coolant and distilled water, which equates to a freeze point of -34°F (-36°C). Coolant concentration testing is possible with a hydrometer or antifreeze tester (such as the Rotunda Battery and Antifreeze Tester, 014–R1060). The level of coolant should be maintained at the “FULL COLD” level or within the “COLD FILL RANGE” in the coolant reservoir. If the level falls below, add coolant per the instructions in the Adding engine coolant section.
Your vehicle was factory-filled with a 50/50 engine coolant and water concentration. If the concentration of coolant falls below 40% or above 60%, the engine parts could become damaged or not work properly. A 50–50 mixture of coolant and water provides the following:
- Freeze protection down to -34°F (-36°C).
- Boiling protection up to 265°F (129°C).
- Protection against rust and other forms of corrosion.
- Enables calibrated gauges to work properly.
239
Maintenance and Specifications
When the engine is cold, check the level of the engine coolant in the reservoir.
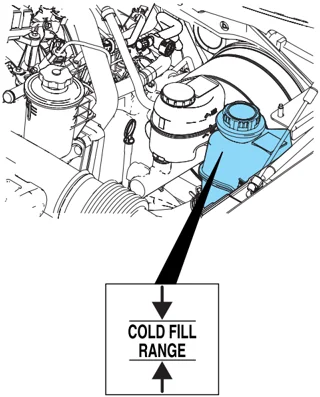
- The engine coolant should be at the “FULL COLD” level or within the “COLD FILL RANGE” as listed on the engine coolant reservoir (depending upon application).
- Refer to the Scheduled Maintenance Guide for service interval schedules.
- Be sure to read and understand Precautions when servicing your vehicle in this chapter.
If the engine coolant has not been checked at the recommended interval, the engine coolant reservoir may become low or empty. If the reservoir is low or empty, add engine coolant to the reservoir. Refer to Adding engine coolant in this chapter.
Note: Automotive fluids are not interchangeable; do not use engine coolant, antifreeze or windshield washer fluid outside of its specified function and vehicle location.
Adding engine coolant
When adding coolant, make sure it is a 50/50 mixture of engine coolant and distilled water. Add the mixture to the coolant reservoir, when the engine is cool, until the appropriate fill level is obtained.
240
Maintenance and Specifications
Do not add engine coolant when the engine is hot. Steam and scalding liquids released from a hot cooling system can burn you badly. Also, you can be burned if you spill coolant on hot engine parts.
Do not put engine coolant in the windshield washer fluid container. If sprayed on the windshield, engine coolant could make it difficult to see through the windshield.
• Add Motorcraft Premium Gold Engine Coolant (yellow-colored), VC-7-A (U.S., except CA and OR), VC-7-B (CA and OR only), meeting Ford Specification WSS-M97B51-A1.
Note: Use of Motorcraft Cooling System Stop Leak Pellets, VC-6, may darken the color of Motorcraft Premium Gold Engine Coolant from yellow to golden tan.
• Do not add/mix an orange-colored, extended life coolant such as Motorcraft Speciality Orange Engine Coolant, VC-2 (US) or CXC-209 (Canada), meeting Ford specification WSS-M97B44-D with the factory-filled coolant. Mixing Motorcraft Speciality Orange Engine Coolant or any orange-colored extended life product with your factory filled coolant can result in degraded corrosion protection.
• A large amount of water without engine coolant may be added, in case of emergency, to reach a vehicle service location. In this instance, the cooling system must be drained and refilled with a 50/50 mixture of engine coolant and distilled water as soon as possible. Water alone (without engine coolant) can cause engine damage from corrosion, overheating or freezing.
• Do not use alcohol, methanol, brine or any engine coolants mixed with alcohol or methanol antifreeze (coolant). Alcohol and other liquids can cause engine damage from overheating or freezing.
• Do not add extra inhibitors or additives to the coolant. These can be harmful and compromise the corrosion protection of the engine coolant.
Add the proper mixture of coolant and water to the "FULL COLD" level. Follow these steps to add engine coolant.
241
Maintenance and Specifications
To reduce the risk of personal injury, make sure the engine is cool before unscrewing the coolant pressure relief cap. The cooling system is under pressure; steam and hot liquid can come out forcefully when the cap is loosened slightly.
- Before you begin, turn the engine off and let it cool.
- When the engine is cool, wrap a thick cloth around the coolant pressure relief cap on the coolant reservoir (an opaque plastic bottle). Slowly turn cap counterclockwise (left) until pressure begins to release.
- Step back while the pressure releases.
- When you are sure that all the pressure has been released, use the cloth to turn it counterclockwise and remove the cap.
- Fill the coolant reservoir slowly with the proper coolant mixture (see above), to within the “COLD FILL RANGE” or the “FULL COLD” level on the reservoir.
- Replace the cap. Turn until tightly installed. Turn cap until click is heard/felt to ensure it is tightly installed.
After any coolant has been added, check the coolant concentration, refer to Checking engine coolant section. If the concentration is not 50/50 (protection to –34° F/–36° C), drain some coolant and adjust the concentration. It may take several drains and additions to obtain a 50/50 coolant concentration.
Whenever coolant has been added, the coolant level in the coolant reservoir should be checked the next few times you drive the vehicle. If necessary, add enough 50/50 concentration of engine coolant and distilled water to bring the liquid level to the proper level.
If you have to add more than 1.0 liter (1.0 quart) of engine coolant per month, have your dealer check the engine cooling system. Your cooling system may have a leak. Operating an engine with a low level of coolant can result in engine overheating and possible engine damage.
Recycled engine coolant
Ford Motor Company does NOT recommend the use of recycled engine coolant in vehicles originally equipped with Motorcraft Premium Gold Engine Coolant since a Ford-approved recycling process is not yet available.
Used engine coolant should be disposed of in an appropriate manner. Follow your community’s regulations and standards for recycling and disposing of automotive fluids.
242
Maintenance and Specifications
Coolant refill capacity
To find out how much fluid your vehicle’s cooling system can hold, refer to Refill capacities in this section. Fill your engine coolant reservoir as outlined in Adding engine coolant in this section.
Severe climates
If you drive in extremely cold climates (less than –36° C [–34° F]):
- It may be necessary to increase the coolant concentration above 50%.
- NEVER increase the coolant concentration above 60%.
- Increased engine coolant concentrations above 60% will decrease the overheat protection characteristics of the engine coolant and may cause engine damage.
- Refer to the chart on the coolant container to ensure the coolant concentration in your vehicle will provide adequate freeze protection at the temperatures in which you drive in the winter months.
If you drive in extremely hot climates:
- It is still necessary to maintain the coolant concentration above 40%.
- NEVER decrease the coolant concentration below 40%.
- Decreased engine coolant concentrations below 40% will decrease the corrosion protection characteristics of the engine coolant and may cause engine damage.
- Decreased engine coolant concentrations below 40% will decrease the freeze protection characteristics of the engine coolant and may cause engine damage.
- Refer to the chart on the coolant container to ensure the coolant concentration in your vehicle will provide adequate protection at the temperatures in which you drive.
Vehicles driven year-round in non-extreme climates should use a 50/50 mixture of engine coolant and distilled water for optimum cooling system and engine protection.
What you should know about fail-safe cooling (if equipped)
If the engine coolant supply is depleted, this feature allows the vehicle to be driven temporarily before incremental component damage is incurred. The “fail-safe” distance depends on ambient temperatures, vehicle load and terrain.
243
Maintenance and Specifications
How fail-safe cooling works
If the engine begins to overheat:
- The engine coolant temperature gauge will move to the red (hot) area.
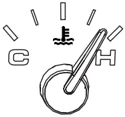
- The mini message center (if equipped) will indicate “Check Gauges”, refer to Warning Lights and Chimes in the Instrument Cluster chapter.
- The message center (if equipped) will indicate a system warning, refer to Message Center in the Driver Controls chapter.
- The Service engine soon indicator light will illuminate.
If the engine reaches a preset over-temperature condition, the engine will automatically switch to alternating cylinder operation. Each disabled cylinder acts as an air pump and cools the engine.
When this occurs the vehicle will still operate. However:
- The engine power will be limited.
- The air conditioning system will be disabled.
Continued operation will increase the engine temperature:
- The engine will completely shut down.
- Steering and braking effort will increase.
Once the engine temperature cools, the engine can be re-started. Take your vehicle to a service facility as soon as possible to minimize engine damage.
When fail-safe mode is activated
You have limited engine power when in the fail-safe mode, so drive the vehicle with caution. The vehicle will not be able to maintain high speed operation and the engine will run rough. Remember that the engine is capable of completely shutting down automatically to prevent engine damage, therefore:
- Pull off the road as soon as safely possible and turn off the engine.
- Arrange for the vehicle to be taken to a service facility.
- If this is not possible, wait a short period for the engine to cool.
- Check the coolant level and replenish if low.
244
Maintenance and Specifications
Never remove the coolant reservoir cap while the engine is running or hot.
- Restart the engine and take your vehicle to a service facility. Driving the vehicle without repairing the engine problem increases the chance of engine damage. Take your vehicle to a service facility as soon as possible.
WHAT YOU SHOULD KNOW ABOUT AUTOMOTIVE FUELS
Important safety precautions
Do not overfill the fuel tank. The pressure in an overfilled tank may cause leakage and lead to fuel spray and fire.
The fuel system may be under pressure. If the fuel filler cap is venting vapor or if you hear a hissing sound, wait until it stops before completely removing the fuel filler cap. Otherwise, fuel may spray out and injure you or others.
If you do not use the proper fuel filler cap, excessive pressure or vacuum in the fuel tank may damage the fuel system or cause the fuel cap to disengage in a collision, which may result in possible personal injury.
Automotive fuels can cause serious injury or death if misused or mishandled.
Gasoline may contain benzene, which is a cancer-causing agent.
245
Maintenance and Specifications
Observe the following guidelines when handling automotive fuel:
- Extinguish all smoking materials and any open flames before fueling your vehicle.
- Always turn off the vehicle before fueling.

- Automotive fuels can be harmful or fatal if swallowed. Fuel such as gasoline is highly toxic and if swallowed can cause death or permanent injury. If fuel is swallowed, call a physician immediately, even if no symptoms are immediately apparent. The toxic effects of fuel may not be visible for hours.
- Avoid inhaling fuel vapors. Inhaling too much fuel vapor of any kind can lead to eye and respiratory tract irritation. In severe cases, excessive or prolonged breathing of fuel vapor can cause serious illness and permanent injury.
- Avoid getting fuel liquid in your eyes. If fuel is splashed in the eyes, remove contact lenses (if worn), flush with water for 15 minutes and seek medical attention. Failure to seek proper medical attention could lead to permanent injury.
- Fuels can also be harmful if absorbed through the skin. If fuel is splashed on the skin and/or clothing, promptly remove contaminated clothing and wash skin thoroughly with soap and water. Repeated or prolonged skin contact with fuel liquid or vapor causes skin irritation.
- Be particularly careful if you are taking “Antabuse” or other forms of disulfiram for the treatment of alcoholism. Breathing gasoline vapors, or skin contact could cause an adverse reaction. In sensitive individuals, serious personal injury or sickness may result. If fuel is splashed on the skin, promptly wash skin thoroughly with soap and water. Consult a physician immediately if you experience an adverse reaction.

When refueling always shut the engine off and never allow sparks or open flames near the filler neck. Never smoke while refueling. Fuel vapor is extremely hazardous under certain conditions. Care should be taken to avoid inhaling excess fumes.
The flow of fuel through a fuel pump nozzle can produce static electricity, which can cause a fire if fuel is pumped into an ungrounded fuel container.
246
Maintenance and Specifications
Use the following guidelines to avoid static build-up when filling an ungrounded fuel container:
• Place approved fuel container on the ground.
• DO NOT fill a fuel container while it is in the vehicle (including the cargo area).
• Keep the fuel pump nozzle in contact with the fuel container while filling.
• DO NOT use a device that would hold the fuel pump handle in the fill position.
Fuel Filler Cap
Your fuel tank filler cap has an indexed design with a 1/4 turn on/off feature.
When fueling your vehicle:
-
Turn the engine off.
-
Carefully turn the filler cap counterclockwise 1/4 of a turn until it stops.
-
Pull to remove the cap from the fuel filler pipe.
-
To install the cap, align the tabs on the cap with the notches on the filler pipe.
-
Turn the filler cap clockwise 1/4 of a turn until it stops.
If the Digital Display reads “CHECK FUEL CAP” and stays on after you start the engine, the fuel filler cap may not be properly installed. Turn off the engine, remove the fuel filler cap, align the cap properly and reinstall it.
If you must replace the fuel filler cap, replace it with a fuel filler cap that is designed for your vehicle. The customer warranty may be void for any damage to the fuel tank or fuel system if the correct genuine Ford or Motorcraft fuel filler cap is not used.
The fuel system may be under pressure. If the fuel filler cap is venting vapor or if you hear a hissing sound, wait until it stops before completely removing the fuel filler cap. Otherwise, fuel may spray out and injure you or others.
247
Maintenance and Specifications
! If you do not use the proper fuel filler cap, excessive pressure or vacuum in the fuel tank may damage the fuel system or cause the fuel cap to disengage in a collision, which may result in possible personal injury.
Choosing the right fuel
Use only UNLEADED FUEL. The use of leaded fuel is prohibited by law and could damage your vehicle.
Your vehicle was not designed to use fuel or fuel additives with metallic compounds, including manganese-based additives. Studies indicate that these additives can cause your vehicle's emission control system to deteriorate more rapidly. In Canada, premium grade fuel generally contains more metallic additives than regular fuel. We recommend using regular grade fuel. In Canada, many fuels contain metallic additives, but fuels free of such additives may be available; check with your local fuel dealer.
Do not use fuel containing methanol. It can damage critical fuel system components.
Repairs to correct the effects of using a fuel for which your vehicle was not designed may not be covered by your warranty.
Octane recommendations
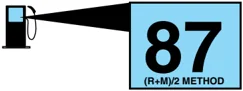
Your vehicle is designed to use "Regular" unleaded gasoline with pump (R+M)/2 octane rating of 87. We do not recommend the use of gasolines labeled as "Regular" that are sold with octane ratings of 86 or lower in high altitude areas.

Do not be concerned if your engine sometimes knocks lightly. However, if it knocks heavily under most driving conditions while you are using fuel with the recommended octane rating, see your dealer or a qualified service technician to prevent any engine damage.
Fuel quality
If you are experiencing starting, rough idle or hesitation driveability problems, try a different brand of unleaded gasoline. "Premium" unleaded gasoline is not recommended for vehicles designed to use "Regular" unleaded gasoline because it may cause these problems to become more pronounced. If the problems persist, see your dealer or a qualified service technician.
248