Driving
STARTING
Positions of the ignition
- OFF/LOCK, locks the steering wheel, automatic transmission gearshift lever and allows key removal.
Note: The ignition key can not be removed from the ignition unless the gearshift lever is securely latched in P (Park).
-
ACCESSORY, allows the electrical accessories such as the radio to operate while the engine is not running.
-
ON, all electrical circuits operational. Warning lights illuminated. Key position when driving.
-
START, cranks the engine. Release the key as soon as the engine starts.
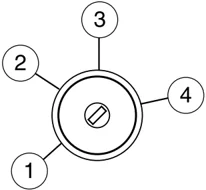
Preparing to start your vehicle
Engine starting is controlled by the powertrain control system. This system meets all Canadian Interference-Causing Equipment standard requirements regulating the impulse electrical field strength of radio noise.
When starting a fuel-injected engine, don't press the accelerator before or during starting. Only use the accelerator when you have difficulty starting the engine. For more information on starting the vehicle, refer to Starting the engine in this chapter.
Extended idling at high engine speeds can produce very high temperatures in the engine and exhaust system, creating the risk of fire or other damage.
Do not park, idle, or drive your vehicle in dry grass or other dry ground cover. The emission system heats up the engine compartment and exhaust system, which can start a fire.
149
Driving
! Do not start your vehicle in a closed garage or in other enclosed areas. Exhaust fumes can be toxic. Always open the garage door before you start the engine. See Guarding against exhaust fumes in this chapter for more instructions.
! If you smell exhaust fumes inside your vehicle, have your dealer inspect your vehicle immediately. Do not drive if you smell exhaust fumes.
I mportant safety precautions
A computer system controls the engine’s idle revolutions per minute (RPM). When the engine starts, the idle RPM runs higher than normal in order to warm the engine. If the engine idle speed does not slow down automatically, have the vehicle checked. Do not allow the vehicle to idle for more than 10 minutes at the higher engine RPM.
Before starting the vehicle:
- Make sure all vehicle occupants have buckled their safety belts. For more information on safety belts and their proper usage, refer to the Seating and Safety Restraints chapter.
- Make sure the headlamps and vehicle accessories are off.
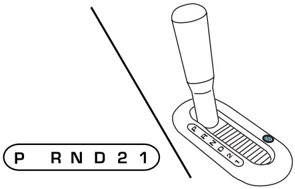
- Make sure the gearshift is in P (Park).

P R N D 2 1
150
Driving
-
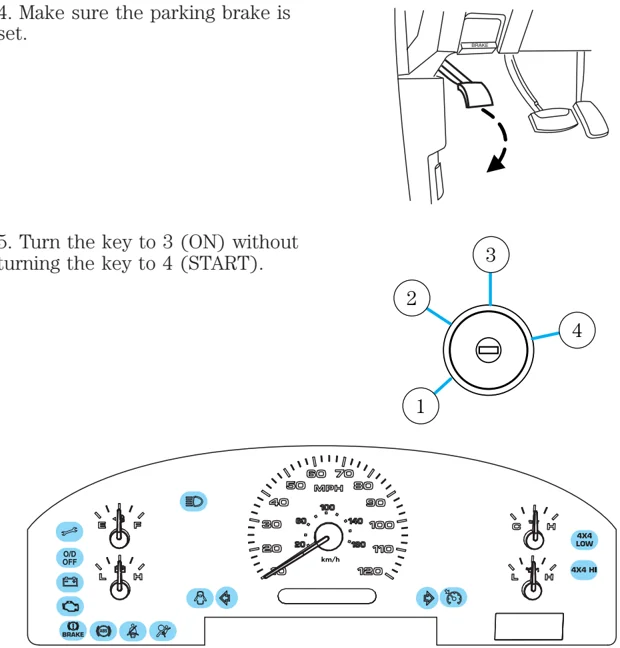
Make sure the parking brake is set.
-
Turn the key to 3 (ON) without turning the key to 4 (START).
151
Driving
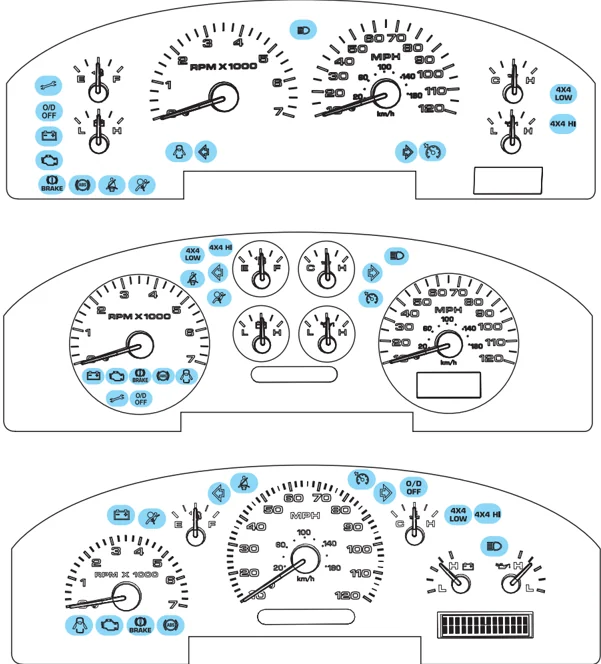
Make sure the corresponding lights illuminate or illuminate briefly. If a light fails to illuminate, have the vehicle serviced.
- If the driver’s safety belt is fastened, the [seatbelt icon] light may not illuminate.
152
Driving
Starting the engine
- Turn the key to 3 (ON) without turning the key to 4 (START). If there is difficulty in turning the key, rotate the steering wheel until the key turns freely.
- Turn the key to 4 (START), then release the key as soon as the engine starts.
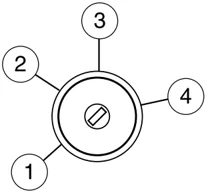
Note: If the engine does not start within five seconds on the first try, turn the key to OFF, wait 10 seconds and try again. If the engine still fails to start, press and hold the accelerator to the floor and try again; this will allow the engine to crank with the fuel shut off in case the engine is flooded with fuel.
Using the engine block heater (if equipped)
An engine block heater warms the engine coolant which aids in starting and heater/defroster performance. Use of an engine block heater is strongly recommended if you live in a region where temperatures reach -10°F (-23°C) or below. For best results, plug the heater in at least three hours before starting the vehicle. The heater can be plugged in the night before starting the vehicle.
To reduce the risk of electrical shock, do not use your heater with ungrounded electrical systems or two-pronged (cheater) adapters.
Guarding against exhaust fumes
Carbon monoxide is present in exhaust fumes. Take precautions to avoid its dangerous effects.
If you smell exhaust fumes inside your vehicle, have your dealer inspect your vehicle immediately. Do not drive if you smell exhaust fumes.
Important ventilating information
If the engine is idling while the vehicle is stopped for a long period of time, open the windows at least one inch (2.5 cm) or adjust the heating or air conditioning to bring in fresh air.
153
Driving
BRAKES
Occasional brake noise is normal. If a metal-to-metal, continuous grinding or continuous squeal sound is present, the brake linings may be worn-out and should be inspected by a qualified service technician. If the vehicle has continuous vibration or shudder in the steering wheel while braking, the vehicle should be inspected by a qualified service technician.
Refer to Brake system warning light in the Instrument Cluster chapter for information on the brake system warning light.
( ! ) BRAKE
Four-wheel anti-lock brake system (ABS)
Your vehicle is equipped with an Anti-lock Braking System (ABS). This system helps you maintain steering control during emergency stops by keeping the brakes from locking. Noise from the ABS pump motor and brake pedal pulsation may be observed during ABS braking and the brake pedal may suddenly travel a little further as soon as ABS braking is done and normal brake operation resumes. These are normal characteristics of the ABS and should be no reason for concern.
Using ABS
When hard braking is required, apply continuous force on the brake pedal; do not pump the brake pedal since this will reduce the effectiveness of the ABS and will increase your vehicle's stopping distance. The ABS will be activated immediately, allowing you to retain full steering control during hard braking and on slippery surfaces. However, the ABS does not decrease stopping distance.
ABS warning lamp
The ABS lamp in the instrument cluster momentarily illuminates when the ignition is turned on. If the light does not illuminate during start up, remains on or flashes, the ABS may be disabled and may need to be serviced.

Even when the ABS is disabled, normal braking is still effective. (If your BRAKE warning lamp illuminates with the parking brake released, have your brake system serviced immediately.)
( ! ) BRAKE
154
Driving
Parking brake
To set the parking brake (1), press the parking brake pedal down until the pedal stops.
To release, pull the lever (2).
! Always set the parking brake fully and make sure that the gearshift is securely latched in P (Park).
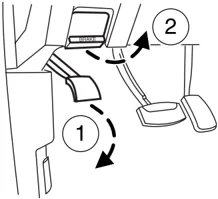
The BRAKE warning lamp will illuminate and will remain illuminated until the parking brake is released.
(!) BRAKE
The parking brake is not recommended to stop a moving vehicle. However, if the normal brakes fail, the parking brake can be used to stop your vehicle in an emergency. Since the parking brake applies only the rear brakes, the vehicle's stopping distance will increase greatly and the handling of your vehicle will be adversely affected.
STEERING
To prevent damage to the power steering system:
- Never hold the steering wheel at its furthest turning points (until it stops) for more than a few seconds when the engine is running.
- Do not operate the vehicle with a low power steering pump fluid level (below the MIN mark on the reservoir).
If the power steering system breaks down (or if the engine is turned off), you can steer the vehicle manually, but it takes more effort.
If the steering wanders or pulls, check for:
- an improperly inflated tire
- uneven tire wear
- loose or worn suspension components
- loose or worn steering components
- improper steering alignment
155
Driving
A high crown in the road or high crosswinds may also make the steering seem to wander/pull.
TRACTION-LOK AXLE (IF EQUIPPED)
This axle provides added traction on slippery surfaces, particularly when one wheel is on a poor traction surface. Under normal conditions, the Traction-Lok axle functions like a standard rear axle. The axle may exhibit a slight noise or vibration in tight turns with low vehicle speed. This is normal behavior and indicates the axle is working.
PREPARING TO DRIVE YOUR VEHICLE
- //ext/c/1/0/0/0/1.0.0.0.1.0.0.0.1.0.0.0.1.0.0.0.1.0.0.0.1.0.0.0.1.0.0.0.1.0.0.0.1.0.0.0.1.0.0.0.1.0.0.0.1.0.0.0.1.0.0.0.1.0.0.0.1.0.0.0.1.0.0.0.1.0.0.0.1.0.0.0.1.0.0.0.1.0.0.0.1.0.0.0.1.0.0.0.1.0.0.0.1.0.0.0.1.0.0.0.1.0.0.0.1.0.0.0.1.0.0.0 ........
Utility vehicles have a significantly higher rollover rate than other types of vehicles.
- //ext/c/1/0/0/0/1.0.0.0.1.0.0.0.1.0.0.0.1.0.0.0.1.0.0.0.1.0.0.0.1.0.0.0.1.0.0.0.1.0.0.0.1.0.0.0.1.0.0.0.1.0.0.0.1.0.0.0.1.0.0.0.1.0.0.0.1.0.0.0.1.0.0.0.1.0.0.0.1.0.0.0.1.0.0.0.1.0.0.0.1.0.0.0.1.0.0.0.1.0.0.0.1.0.0.0.1.0.0.0.1.0.0.0.1.0.0.0.1.0.0.0.1.0.0.0.1.0.0.0.1.0.0.0.1.0.0.0.1.0.0.0.1.0.0.0.1.0.0.0.1.0.0.0.1.0.0.0.1.0.0.0.1.0.0.0.1.0.0.0.1.0.0.0.1.0.0.0.1.0.0.0.1.0.0.0.1.0.0.0.1.0.0.0.1.0.0.0.1.0.0.0.1 ........
In a rollover crash, an unbelted person is significantly more likely to die than a person wearing a safety belt.
Your vehicle has larger tires and increased ground clearance, giving the vehicle a higher center of gravity than a passenger car.
- //ext/c/1/0/0/0/1.0.0.0.1.0.0.0.1.0.0.0.1.0.0.0.1.0.0.0.1.0.0.0.1.0.0.0.1.0.0.0.1.0.0.0.1.0.0.0.1.0.0.0.1.0.0.0.1.0.0.0.1.0.0.0.1.0.0.0.1.0.0.0.1.0.0.0.1.0.0.0.1.0.0.0.1.0.0.0.1.0.0.0.1.0.0.0.1.0.0.0.1.0.0.0.1.0.0.0.1.0.0.0.1.0.0.0.1.0.0.0.1.0.0.0.1.0.0.0.1.0.0 ........
Driving
If you cannot move the gearshift lever out of P (Park) with ignition in the ON position and the brake pedal depressed, it is possible that a fuse has blown or the vehicle's brakelamps are not operating properly. Refer to Fuses and relays in the Roadside Emergencies chapter.
If the fuse is not blown, perform the following procedure:
-
Apply the parking brake, turn the ignition to OFF/LOCK, then remove the key.
-
Locate the round access plug on the underside of the steering column cover.
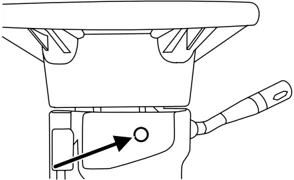
-
Remove the access plug using a flat head screwdriver, then push the override button using a flat head screwdriver, apply the brake pedal and shift the transmission into N (Neutral).
-
Reinstall the access plug cover, start the vehicle and release the parking brake.
Do not drive your vehicle until you verify that the brakelamps are working.
Always set the parking brake fully and make sure the gearshift is latched in P (Park). Turn the ignition to the OFF/LOCK position and remove the key whenever you leave your vehicle.
If the parking brake is fully released, but the brake warning lamp remains illuminated, the brakes may not be working properly. See your dealer or a qualified service technician.
Brake-shift interlock - floor-shift transmission
This vehicle is equipped with a brake-shift interlock feature that prevents the gearshift lever from being moved from P (Park) when the ignition is in the ON position unless brake pedal is depressed.
157
Driving
If you cannot move the gearshift lever out of P (Park) with ignition in the ON position and the brake pedal depressed, it is possible that a fuse has blown or the vehicle's brakelamps are not operating properly. Refer to Fuses and relays in the Roadside Emergencies chapter.
If the fuse is not blown, perform the following procedure:
- Apply the parking brake, turn the ignition to LOCK, then remove the key.
- Open the center console bin. Using a screwdriver, carefully pry off the console finish panel surrounding the shifter mechanism by inserting a screwdriver into the latch slot as shown.
- Remove console finish panel assembly to expose the inside of the gearshift.

- Press and hold the white button located along side the shifter housing assembly (as shown in the illustration). Press the gearshift lever release on the shifter knob and move the gearshift lever back to N (Neutral) (two places rearward from P [Park]).
- Start the vehicle and release the parking brake.
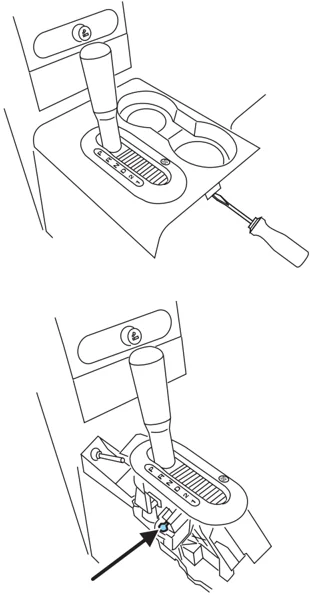
Do not drive your vehicle until you verify that the brakelamps are working.
158
Driving
Always set the parking brake fully and make sure the gearshift is latched in P (Park). Turn the ignition to the LOCK position and remove the key whenever you leave your vehicle.
If the parking brake is fully released, but the brake warning lamp remains illuminated, the brakes may not be working properly. See your dealer or a qualified service technician.
Understanding the gearshift positions of the 4-speed automatic transmission

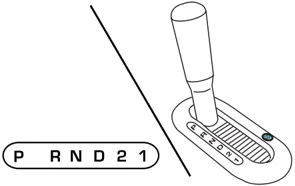
P R N D 2 1
Your vehicle’s automatic transmission is equipped with a special shift strategy that insures maximum heater performance during cold weather operation.
When ambient temperature is 23°F (–5°C) or below and the engine coolant temperature is below 100°F (38°C), light throttle upshifts may be slightly delayed. Once the engine coolant temperature reaches 160°F (71°C) the normal shift strategy will resume. This is normal operation and will not affect the function or the durability of the transmission.
If the normal shift strategy does not resume once the engine coolant temperature reaches the normal operating temperature, or if the downshifts and other throttle conditions do not function normally, see your dealer or a qualified service technician as soon as possible.
P (Park) This position locks the transmission and prevents the rear wheels from turning.
159
Driving
To put your vehicle in gear:
• Start the engine
• Depress the brake pedal
• Move the gearshift lever into the desired gear
• Release the parking brake.
To put your vehicle in P (Park):
• Come to a complete stop
• Move the gearshift lever and securely latch it in P (Park)
Always set the parking brake fully and make sure the gearshift is latched in P (Park). Turn the ignition to the LOCK position and remove the key whenever you leave your vehicle.
R (Reverse)
With the gearshift lever in R (Reverse), the vehicle will move backward. Always come to a complete stop before shifting into and out of R (Reverse).
N (Neutral)
With the gearshift lever in N (Neutral), the vehicle can be started and is free to roll. Hold the brake pedal down while in this position.
D (Overdrive)
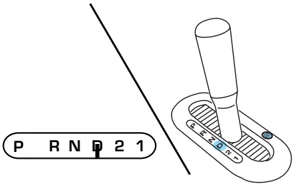
The normal driving position for the best fuel economy. Transmission operates in gears one through four.

Overdrive can be deactivated by pressing the transmission control switch on the end of the gearshift lever (column-shift transmission) or on the gearshift bezel (floor-shift transmission).
160
Driving
• Column-shift transmission

• Floor-shift transmission
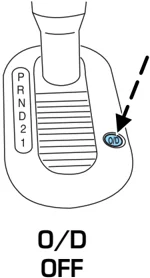
The transmission control indicator (TCIL) will illuminate on the instrument cluster.
O/D OFF
Drive (not shown) Drive is activated when the transmission control switch is pressed. • This position allows for all forward gears except overdrive. • O/D OFF lamp is illuminated. • Provides engine braking. • Use when driving conditions cause excessive shifting from O/D to other gears. Examples: city traffic, hilly terrain, heavy loads, trailer towing and when engine braking is required. • To return to O/D (Overdrive), press the transmission control switch. The O/D OFF lamp will not be illuminated. • O/D (Overdrive) is automatically returned each time the key is turned off.
2 (Second) This position allows for second gear only. • Provides engine braking. • Use to start-up on slippery roads.
161
Driving
- To return to D (Overdrive), move the gearshift lever into the D (Overdrive) position.
- Selecting 2 (Second) at higher speeds will cause the transmission to downshift to second gear at the appropriate vehicle speed.
1 (First)
- Provides maximum engine braking.
- Allows upshifts by moving gearshift lever.
- Will not downshift into 1 (First) at high speeds; allows for 1 (First) when vehicle reaches slower speeds.
Forced downshifts
- Allowed in D (Overdrive) or Drive.
- Depress the accelerator to the floor.
- Allows transmission to select an appropriate gear.
I f your vehicle gets stuck in mud or snow
If your vehicle gets stuck in mud or snow, it may be rocked out by shifting between forward and reverse gears, stopping between shifts in a steady pattern. Press lightly on the accelerator in each gear.
Do not rock the vehicle if the engine is not at normal operating temperature or damage to the transmission may occur.
Do not rock the vehicle for more than a minute or damage to the transmission and tires may occur, or the engine may overheat.
REVERSE SENSING SYSTEM (IF EQUIPPED)
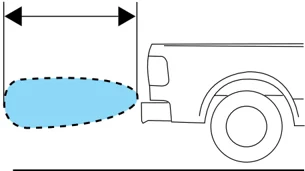
The Reverse Sensing System (RSS) sounds a tone to warn the driver of obstacles near the rear bumper when the R (Reverse) is selected and the vehicle is moving at speeds less than 3 mph (5 km/h). The system is not effective at speeds above 3 mph (5 km/h) and may not detect certain angular or moving objects.
To help avoid personal injury, please read and understand the limitations of the reverse sensing system as contained in this section. Reverse sensing is only an aid for some (generally large and fixed) objects when moving in reverse on a flat surface at "parking speeds". Inclement weather may also affect the function of the RSS; this may include reduced performance or a false activation.
162
Driving
To help avoid personal injury, always use caution when in reverse and when using the RSS.
This system is not designed to prevent contact with small or moving objects. The system is designed to provide a warning to assist the driver in detecting large stationary objects to avoid damaging the vehicle. The system may not detect smaller objects, particularly those close to the ground.
Certain add-on devices such as large trailer hitches, bike or surfboard racks and any device that may block the normal detection zone of the RSS system may create false beeps.
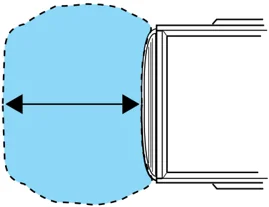
The RSS detects obstacles up to 6 feet (2 meters.) from the rear bumper with a decreased coverage area at the outer corners of the bumper, (refer to the figures for approximate zone coverage areas). As you move closer to the obstacle, the rate of the tone increases. When the obstacle is less than 10 inches (25.0 cm) away, the tone will sound continuously. If the RSS detects a stationary or receding object further than 10 inches (25.0 cm) from the side of the vehicle, the tone will sound for only three seconds. Once the system detects an object approaching, the tone will sound again.

The RSS may have reduced performance or an increased chance of false detection if the tailgate is not locked and in the upright position. If the tailgate is down, the RSS tone may be heard intermittently or continuously. The tone may also be heard if items in the truck bed protrude rearward outside the bed.
163
Driving
The RSS automatically turns on when the gearshift lever is placed in R (Reverse) and the ignition is ON. An RSS control allows the driver to turn the RSS on and off. To turn the RSS off, the ignition must be ON, and the gear selector in R (Reverse). An indicator light on the control will illuminate when the system is turned off. If the indicator light illuminates when the RSS is not turned off, it may indicate a failure in the RSS. The RSS will remain off until either the RSS control is pushed again or the ignition switch is recycled.

Keep the RSS sensors (located on the rear bumper/fascia) free from snow, ice and large accumulations of dirt (do not clean the sensors with sharp objects). If the sensors are covered, it will affect the accuracy of the RSS.
If your vehicle sustains damage to the rear bumper/fascia, leaving it misaligned or bent, the sensing zone may be altered causing inaccurate measurement of obstacles or false alarms.
FOUR-WHEEL DRIVE (4WD) OPERATION (IF EQUIPPED)
For important information regarding safe operation of this type of vehicle, see Preparing to drive your vehicle in this chapter.
Four-wheel drive (4WD) supplies power to all four wheels. 4WD should not be operated on dry pavement; driveline damage may occur.
If equipped with the Electronic Shift 4WD System, and 4WD Low is selected while the vehicle is moving, the 4WD system will not engage. This is normal and should be no reason for concern. Refer to Shifting to/from 4WD Low for proper operation.
System indicator lights
• 4X4 HI - Momentarily illuminates when the engine is started. Illuminates when 4H is selected. 4x4 HI
• 4X4 LOW – Momentarily illuminates when the engine is started. Illuminates when 4L is selected. 4x4 LOW
164
Driving
Using a manual 4WD system (if equipped)
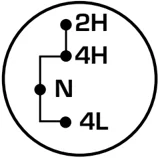
2H (2WD High) – Power to the rear wheels only; used for street and highway driving. Provides optimal smoothness and fuel economy at high speeds.
4H (4WD High) – Used for extra traction such as in snow or icy roads or in off-road situations. Not intended for use on dry pavement.
N (Neutral) – No power to either front or rear wheels.
4L (4WD Low)– Uses extra gearing to provide maximum power to all four wheels at reduced speeds. Intended only for off-road applications such as deep sand, steep grades or pulling heavy objects. 4L (4WD Low) will not engage while the vehicle is moving; this is normal and should be no reason for concern. Refer to Shifting to/from 4L (4WD Low) for proper operation.
Shifting between 2H (2WD high) and 4H (4WD high)
• Move the transfer case lever between 2H (2WD High) and 4H (4WD High) at a stop or any forward speed up to 55 mph (88 km/h).
Note: Do not perform this operation at speeds above 45 mph (72 km/h) if the outside temperature is below 32°F (0°C).
Note: Do not perform this operation if the rear wheels are slipping.
Note: Some noise may be heard as the system shifts or engages; this is normal.
Shifting to/from 4L (4WD Low)
- Bring the vehicle to a complete stop.
- Depress the brake.
- On vehicles equipped with an automatic transmission, place the transmission in N (Neutral); on vehicles equipped with a manual transmission, depress the clutch.
165
Driving
- Move the transfer case lever through N (Neutral) directly to the desired position.
- If the transfer case will not engage into 4L (4WD Low), drive the vehicle above 5 mph (8 km/h), then repeat steps 1 through 4.
Note: Some noise may be heard as the system shifts or engages; this is normal.
Note: For proper operation in 4WD Low, ensure the transfer case shift lever is moved entirely rearward in to the 4L (4WD Low) position and that the 4x4 Low light is illuminated.
Using the N (Neutral) position
The transfer case N (Neutral) position overrides the transmission and puts the vehicle in neutral regardless of transmission gearshift lever position. The vehicle can move forward or backward.
This position should only be used when towing the vehicle.
Do not leave the vehicle unattended with the transfer case in the N (Neutral) position. Always set the parking brake fully and turn off the ignition when leaving the vehicle.
Using the electronic shift 4WD system (if equipped)

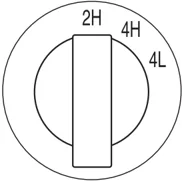
2H (2WD High) - Power to the rear wheels only; used for street and highway driving. Provides optimal smoothness and fuel economy at high speeds.
4H (4WD High) - Used for extra traction such as in snow or icy roads or in off-road situations. Not intended for use on dry pavement.
4L (4WD Low) - Uses extra gearing to provide maximum power to all four wheels at reduced speeds. Intended only for off-road applications such as deep sand, steep grades or pulling heavy objects. 4L (4WD Low)
166
Driving
will not engage while the vehicle is moving; this is normal and should be no reason for concern. Refer to Shifting to/from 4L (4WD Low) for proper operation.
Shifting between 2H (2WD High) and 4H (4WD High)
- Move the 4WD control between 2H and 4H at any forward speed up to 55 mph (88 km/h).
Note: Do not perform this operation at speeds above 45 mph (72 km/h) if the outside temperature is below 32°F (0°C).
Note: Do not perform this operation if the rear wheels are slipping.
Note: Some noise may be heard as the system shifts or engages; this is normal.
Shifting to/from 4L (4WD Low)
- Bring the vehicle to a complete stop
- Depress the brake
- On vehicles equipped with an automatic transmission, place the transmission in N (Neutral); on vehicles equipped with a manual transmission, depress the clutch.
- Move the 4WD control to the desired position.
-
If shifting into 4L (4WD Low), wait for the 4X4 LOW light in the instrument cluster to turn on indicating the shift is complete.
-
If shifting out of 4L (4WD Low), wait for the 4X4 LOW light in the instrument cluster turn turn off indicating the shift is complete.
Note: Some noise may be heard as the system shifts or engages; this is normal.
Driving off-road with truck and utility vehicles
4WD vehicles are specially equipped for driving on sand, snow, mud and rough terrain and have operating characteristics that are somewhat different from conventional vehicles, both on and off the road.
How your vehicle differs from other vehicles
Truck and utility vehicles can differ from some other vehicles. Your vehicle may be higher to allow it to travel over rough terrain without getting hung up or damaging underbody components.
The differences that make your vehicle so versatile also make it handle differently than an ordinary passenger car.
Maintain steering wheel control at all times, especially in rough terrain. Since sudden changes in terrain can result in abrupt steering wheel motion, make sure you grip the steering wheel from the outside. Do not grip the spokes.
167
Driving
Drive cautiously to avoid vehicle damage from concealed objects such as rocks and stumps.
You should either know the terrain or examine maps of the area before driving. Map out your route before driving in the area. To maintain steering and braking control of your vehicle, you must have all four wheels on the ground and they must be rolling, not sliding or spinning.
Basic operating principles
- Do not use 4WD on dry, hard surfaced roads. Doing so will produce excessive noise, increase tire wear and may damage drive components. 4WD modes are only intended for consistently slippery or loose surfaces.
- Drive slower in strong crosswinds which can affect the normal steering characteristics of your vehicle.
- Be extremely careful when driving on pavement made slippery by loose sand, water, gravel, snow or ice.
If your vehicle goes off the edge of the pavement
- If your vehicle goes off the edge of the pavement, slow down, but avoid severe brake application, ease the vehicle back onto the pavement only after reducing your speed. Do not turn the steering wheel too sharply while returning to the road surface.
- It may be safer to stay on the apron or shoulder of the road and slow down gradually before returning to the pavement. You may lose control if you do not slow down or if you turn the steering wheel too sharply or abruptly.
- It often may be less risky to strike small objects, such as highway reflectors, with minor damage to your vehicle rather than attempt a sudden return to the pavement which could cause the vehicle to slide sideways out of control or roll over. Remember, your safety and the safety of others should be your primary concern.
Vehicles with a higher center of gravity such as utility and four-wheel drive vehicles handle differently than vehicles with a lower center of gravity. Utility and four-wheel drive vehicles are not designed for cornering at speeds as high as passenger cars any more than low-slung sports cars are designed to perform satisfactorily under off-road conditions. Avoid sharp turns, excessive speed and abrupt maneuvers in these vehicles. Failure to drive cautiously could result in an increased risk of loss of vehicle control, vehicle rollover, personal injury and death.
168
Driving
If your vehicle gets stuck
If your vehicle gets stuck in mud or snow it may be rocked out by shifting between forward and reverse gears, stopping between shifts, in a steady pattern. Press lightly on the accelerator in each gear.
Do not rock the vehicle if the engine is not at normal operating temperature or damage to the transmission may occur.
Do not rock the vehicle for more than a few minutes or damage to the transmission and tires may occur or the engine may overheat.

Do not spin the wheels at over 35 mph (56 km/h). The tires may fail and injure a passenger or bystander.
Emergency maneuvers
-
In an unavoidable emergency situation where a sudden sharp turn must be made, remember to avoid “over-driving” your vehicle, i.e., turn the steering wheel only as rapidly and as far as required to avoid the emergency. Excessive steering will result in less vehicle control, not more. Additionally, smooth variations of the accelerator and/or brake pedal pressure should be utilized if changes in vehicle speed are called for. Avoid abrupt steering, acceleration or braking which could result in an increased risk of loss of vehicle control, vehicle rollover and/or personal injury. Use all available road surface to return the vehicle to a safe direction of travel.
-
In the event of an emergency stop, avoid skidding the tires and do not attempt any sharp steering wheel movements.
Vehicles with a higher center of gravity such as utility and four-wheel drive vehicles handle differently than vehicles with a lower center of gravity. Utility and four-wheel drive vehicles are not designed for cornering at speeds as high as passenger cars any more than low-slung sports cars are designed to perform satisfactorily under off-road conditions. Avoid sharp turns, excessive speed and abrupt maneuvers in these vehicles. Failure to drive cautiously could result in an increased risk of loss of vehicle control, vehicle rollover, personal injury and death.
- If the vehicle goes from one type of surface to another (i.e., from concrete to gravel) there will be a change in the way the vehicle responds to a maneuver (steering, acceleration or braking). Again, avoid these abrupt inputs.
169
Driving
Parking
On some 4WD vehicles, when the transfer case is in the N (Neutral) position, the engine and transmission are disconnected from the rest of the driveline. Therefore, the vehicle is free to roll even if the automatic transmission is in P (Park) or the manual transmission is in gear. Do not leave the vehicle unattended with the transfer case in the N (Neutral) position. Always set the parking brake fully and turn off the ignition when leaving the vehicle.
Always set the parking brake fully and make sure the gearshift is latched in P (Park). Turn the ignition to the LOCK position and remove the key whenever you leave your vehicle.
If the parking brake is fully released, but the brake warning lamp remains illuminated, the brakes may not be working properly. See your dealer or a qualified service technician.
4WD Systems
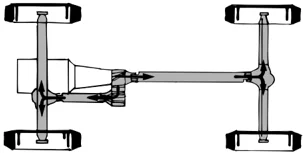
4WD (when you select a 4WD mode) uses all four wheels to power the vehicle. This increases traction, enabling you to drive over terrain and road conditions that a conventional two-wheel drive vehicle cannot.
Power is supplied to all four wheels through a transfer case. On 4WD vehicles, the transfer case allows you to select 4WD when necessary. Information on transfer case operation and shifting procedures can be found in the Driving chapter. Information on transfer case maintenance can be found in the Maintenance and Specifications chapter. You should become thoroughly familiar with this information before you operate your vehicle.

Normal characteristics
On some 4WD models, the initial shift from two-wheel drive to 4x4 while the vehicle is moving can cause some momentary clunk and ratcheting sounds. This is the front drivetrain coming up to speed and the automatic locking hubs engaging and is not cause for concern.
170
Driving
Sand
When driving over sand, try to keep all four wheels on the most solid area of the trail. Avoid reducing the tire pressures but shift to a lower gear and drive steadily through the terrain. Apply the accelerator slowly and avoid spinning the wheels.
If you must reduce the tire pressure for whatever reason in sand, make sure you re-inflate the tires as soon as possible.
Avoid excessive speed because vehicle momentum can work against you and cause the vehicle to become stuck to the point that assistance may be required from another vehicle. Remember, you may be able to back out the way you came if you proceed with caution.
Mud and water
If you must drive through high water, drive slowly. Traction or brake capability may be limited.
When driving through water, determine the depth; avoid water higher than the bottom of the hubs (if possible) and proceed slowly. If the ignition system gets wet, the vehicle may stall.
 Once through water, always try the brakes. Wet brakes do not stop the vehicle as effectively as dry brakes. Drying can be improved by moving your vehicle slowly while applying light pressure on the brake pedal.
Be cautious of sudden changes in vehicle speed or direction when you are driving in mud. Even 4WD vehicles can lose traction in slick mud. As when you are driving over sand, apply the accelerator slowly and avoid spinning your wheels. If the vehicle does slide, steer in the direction of the slide until you regain control of the vehicle.
If the transmission, transfer case or front axle are submerged in water, their fluids should be checked and changed, if necessary.
Driving through deep water may damage the transmission.
If the front or rear axle is submerged in water, the axle lubricant should be replaced.
After driving through mud, clean off residue stuck to rotating driveshafts and tires. Excess mud stuck on tires and rotating driveshafts causes an imbalance that could damage drive components.
171
Driving
“Tread Lightly” is an educational program designed to increase public awareness of land-use regulations and responsibilities in our nations wilderness areas. Ford Motor Company joins the U.S. Forest Service and the Bureau of Land Management in encouraging you to help preserve our national forest and other public and private lands by “treading lightly.”

Driving on hilly or sloping terrain
Although natural obstacles may make it necessary to travel diagonally up or down a hill or steep incline, you should always try to drive straight up or straight down. Avoid driving crosswise or turning on steep slopes or hills. A danger lies in losing traction, slipping sideways and possibly rolling over. Whenever driving on a hill, determine beforehand the route you will use. Do not drive over the crest of a hill without seeing what conditions are on the other side. Do not drive in reverse over a hill without the aid of an observer.
When climbing a steep slope or hill, start in a lower gear rather than downshifting to a lower gear from a higher gear once the ascent has started. This reduces strain on the engine and the possibility of stalling.
If you do stall out, do not try to turn around because you might roll over. It is better to back down to a safe location.
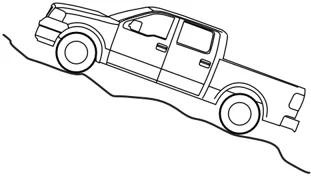
Apply just enough power to the wheels to climb the hill. Too much power will cause the tires to slip, spin or lose traction, resulting in loss of vehicle control.
172
Driving
Descend a hill in the same gear you would use to climb up the hill to avoid excessive brake application and brake overheating. Do not descend in neutral; instead, disengage overdrive or manually shift to a lower gear. When descending a steep hill, avoid sudden hard braking as you could lose control. When you brake hard, the front wheels can’t turn and if they aren’t turning, you won’t be able to steer. The front wheels have to be turning in order to steer the vehicle. Rapid pumping of the brake pedal will help you slow the vehicle and still maintain steering control.
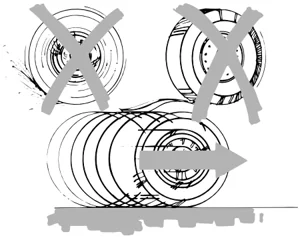
If your vehicle has anti-lock brakes, apply the brakes steadily. Do not “pump” the brakes.
Driving on snow and ice
4WD vehicles have advantages over 2WD vehicles in snow and ice but can skid like any other vehicle.
Should you start to slide while driving on snowy or icy roads, turn the steering wheel in the direction of the slide until you regain control.
Avoid sudden applications of power and quick changes of direction on snow and ice. Apply the accelerator slowly and steadily when starting from a full stop.
Avoid sudden braking as well. Although a 4WD vehicle may accelerate better than a two-wheel drive vehicle in snow and ice, it won’t stop any faster, because as in other vehicles, braking occurs at all four wheels. Do not become overconfident as to road conditions.
Make sure you allow sufficient distance between you and other vehicles for stopping. Drive slower than usual and consider using one of the lower gears. In emergency stopping situations, apply the brake steadily. Do not “pump” the brakes. Refer to the Brakes section of this chapter for additional information on the operation of the Anti-lock Brake System (ABS).
Never drive with chains on the front tires of 4WD vehicles without also putting them on the rear tires. This could cause the rear to slide and swing around during braking.
173