Driving
Tires, Replacement Requirements
 Do not use a size and type of tire and wheel other than that originally provided by Ford Motor Company because it can affect the safety and performance of your vehicle, which could result in an increased risk of loss of vehicle control, vehicle rollover and/or serious personal injury or death.
Make sure all tires and wheels on the vehicle are of the same size, type, tread design and load-carrying capacity. If you have questions regarding tire replacement, see an authorized Ford or Lincoln/Mercury dealer.
If you nevertheless decide to equip your 4WD for off-road use with tires larger than what Ford Motor Company recommends, you should not use these tires for highway driving.
If you use any tire/wheel combination not recommended by Ford Motor Company, it may adversely affect vehicle handling and could cause steering, suspension, axle or transfer case failure as well as the increased risk of loss of vehicle control.
Do not use “aftermarket lift kits” or other suspension modifications, whether or not they are used with larger tires and wheels.
These “aftermarket lift kits” could adversely affect the vehicle’s handling characteristics, which could lead to loss of vehicle control or rollover and serious injury.
Tires can be damaged during off-road use. For your safety, tires that are damaged should not be used for highway driving because they are more likely to blow out or fail.
You should carefully observe the recommended tire inflation pressure found on the safety compliance certification label attached to the left front door lock facing or door latch post pillar. Failure to follow tire pressure recommendations can adversely affect the way your vehicle handles. Do not exceed the Ford Motor Company recommended pressure even if it is less than the maximum pressure allowed for the tire.
174
Driving
Each day before you drive, check your tires. If one looks lower than the others, use a tire gauge to check pressure of all tires, and adjust if required. Check tire pressure with a tire gauge monthly (including spare). Safe vehicle operation requires your tires to be set at the proper pressure and your vehicle not be overloaded.
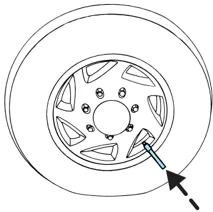
Periodically inspect the tire treads and remove stones, nails, glass or other objects that may be wedged in the tread grooves. Check for holes or cuts that may permit air leakage from the tire and make necessary repairs.
Inspect the tire sidewalls for cuts, bruises and other damage. If internal damage to the tire is suspected, have the tire demounted and inspected in case it needs to be repaired or replaced.
Maintenance and Modifications
The suspension and steering systems on your vehicle have been designed and tested to provide predictable performance whether loaded or empty and durable load carrying capability. For this reason, Ford Motor Company strongly recommends that you do not make modifications such as adding or removing parts (such as lift kits or stabilizer bars) or by using replacement parts not equivalent to the original factory equipment.
Any modifications to a vehicle that raise the center of gravity can make it more likely the vehicle will roll over as a result of a loss of control.
Ford Motor Company recommends that caution be used with any vehicle equipped with a high load or device (such as ladder racks or pickup box cover).
Failure to maintain your vehicle properly may void the warranty, increase your repair cost, reduce vehicle performance and operational capabilities and adversely affect driver and passenger safety. Frequent inspection of vehicle chassis components is recommended if the vehicle is subjected to heavy off-road usage.
DRIVING THROUGH WATER
If driving through deep or standing water is unavoidable, proceed very slowly especially when the depth is not known. Never drive through water that is higher than the bottom of the hubs (for trucks) or the
175
Driving
bottom of the wheel rims (for cars). When driving through water, traction or brake capability may be limited. Also, water may enter your engine's air intake and severely damage your engine or your vehicle may stall. Driving through deep water where the transmission vent tube is submerged may allow water into the transmission and cause internal transmission damage.
Once through the water, always dry the brakes by moving your vehicle slowly while applying light pressure on the brake pedal. Wet brakes do not stop the vehicle as quickly as dry brakes.
VEHICLE LOADING – WITH AND WITHOUT A TRAILER
This section will guide you in the proper loading of your vehicle and/or trailer, to keep your loaded vehicle weight within its design rating capability, with or without a trailer. Properly loading your vehicle will provide maximum return of vehicle design performance. Before loading your vehicle, familiarize yourself with the following terms for determining your vehicle's weight ratings, with or without a trailer, from the vehicle's Safety Certification Label and Tire Label:
Base Curb Weight – is the weight of the vehicle including a full tank of fuel and all standard equipment. It does not include passengers, cargo, or optional equipment.
Vehicle Curb Weight – is the weight of your new vehicle when you picked it up from your dealer plus any aftermarket equipment.
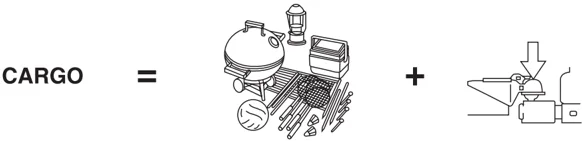
CARGO = +
Cargo Weight – includes all weight added to the Base Curb Weight, including cargo and optional equipment. When towing, trailer tongue load or king pin weight is also part of cargo weight.
GAW (Gross Axle Weight) – is the total weight placed on each axle (front and rear) – including vehicle curb weight and all payload.
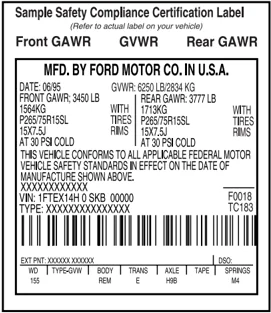
GAWR (Gross Axle Weight Rating) – is the maximum allowable weight that can be carried by a single axle (front or rear). These
176
Driving
numbers are shown on the Safety Compliance Certification Label located on the driver’s door or B-Pillar. The total load on each axle must never exceed its GAWR.
Exceeding the Safety Certification Label axle weight rating limits could result in substandard vehicle handling or performance, engine, transmission and/or structural damage, serious damage to the vehicle, loss of control and personal injury.
Note: For trailer towing information refer to Trailer towing found in this chapter or the RV and Trailer Towing Guide provided by your dealership.

GVW (Gross Vehicle Weight) – is the Vehicle Curb Weight + cargo + passengers.
GVWR (Gross Vehicle Weight Rating) – is the maximum allowable weight of the fully loaded vehicle (including all options, equipment, passengers and cargo). The GVWR is shown on the Safety Compliance Certification Label located on the driver’s door or B-Pillar. The GVW must never exceed the GVWR.
Sample Safety Compliance Certification Label (Refer to actual label on your vehicle)
Front GAWR GVWR Rear GAWR
MFD. BY FORD MOTOR CO. IN U.S.A.
DATE: 08/95 FRONT GAWR: 3450 LB 1564KG P265/75R15SL 15X7.5J AT 30 PSI COLD
GVWR: 6250 LB/2834 KG REAR GAWR: 3777 LB 1713KG WITH P265/75R15SL 15X7.5J AT 30 PSI COLD
THIS VEHICLE CONFORMS TO ALL APPLICABLE FEDERAL MOTOR VEHICLE SAFETY STANDARDS IN EFFECT ON THE DATE OF MANUFACTURE SHOWN ABOVE XXXXXXXXXXXX VIN: 1FTEX14H□ SKB □□□□ TYPE: XXXXXXXXXXXXXX
F0018 TC183
EXT PNT: XXXXXX XXXXXX CSO WD | TYPE GVW | BODY | TRANS | AXLE | TAPE | SPRINGS 165 | | REM | E | H98 | | M4
177
Driving
Exceeding the Safety Certification Label vehicle weight rating limits could result in substandard vehicle handling or performance, engine, transmission and/or structural damage, serious damage to the vehicle, loss of control and personal injury.
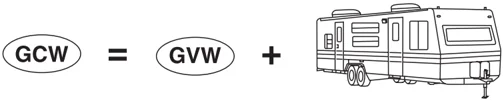
GCW (Gross Combined Weight) – is the weight of the loaded vehicle (GVW) plus the weight of the fully loaded trailer.
GCWR (Gross Combined Weight Rating) – is the maximum allowable weight of the vehicle and the loaded trailer – including all cargo and passengers – that the vehicle can handle without risking damage. (Important: The towing vehicle’s braking system is rated for operation at GVWR, not at GCWR. Separate functional brakes should be used for safe control of towed vehicles and for trailers where the GCW of the towing vehicle plus the trailer exceed the GVWR of the towing vehicle. The GCW must never exceed the GCWR.
Maximum Loaded Trailer Weight – is the highest possible weight of a fully loaded trailer the vehicle can tow. It assumes a vehicle with only mandatory options, no cargo (internal or external), a tongue load of 10–15% (conventional trailer) or king pin weight of 15–25% (fifth wheel trailer), and driver only (150 lbs [68 kg]). Consult your dealership (or the RV and Trailer Towing Guide provided by your dealership) for more detailed information.
Tongue Load or Fifth Wheel King Pin Weight – refers to the amount of the weight that a trailer pushes down on a trailer hitch.
Examples: For a 5,000 lbs. (2,268 kg) conventional trailer, multiply 5,000 by 0.10 and 0.15 to obtain a proper tongue load range of 500 to 750 lbs. (227 to 340 kg). For an 11,500 lbs. (5,216 kg) fifth wheel trailer, multiply by 0.15 and 0.25 to obtain a proper king pin load range of 1,725 to 2,875 lbs. (782 to 1,304 kg)
Do not exceed the GVWR or the GAWR specified on the certification label.
178
Driving
Do not use replacement tires with lower load carrying capacities than the originals because they may lower the vehicle’s GVWR and GAWR limitations. Replacement tires with a higher limit than the originals do not increase the GVWR and GAWR limitations.
Exceeding any vehicle weight rating limitation could result in serious damage to the vehicle and/or personal injury.
Special loading instructions for owners of pickup trucks and utility-type vehicles
For important information regarding safe operation of this type of vehicle, see the Preparing to drive your vehicle section in this chapter.
Loaded vehicles may handle differently than unloaded vehicles. Extra precautions, such as slower speeds and increased stopping distance, should be taken when driving a heavily loaded vehicle.
Your vehicle can haul more cargo and people than most passenger cars. Depending upon the type and placement of the load, hauling cargo and people may raise the center of gravity of the vehicle.
Calculating the load your vehicle can carry/tow
- Use the appropriate maximum GCWR chart (in the Trailer towing section in this chapter) for your type of engine, rear axle ratio and tire size.
- Weigh your vehicle without cargo. To obtain correct weights, take your vehicle to a shipping company or an inspection station for trucks.
- Subtract your loaded weight from the maximum GCWR in the chart. This is the maximum trailer weight your vehicle can tow. It must be below the maximum trailer weight shown in the chart.
TRAILER TOWING
Your vehicle may tow a class I, II, III or IV trailer provided the maximum trailer weight is less than or equal to the maximum trailer weight listed for your engine and rear axle ratio on the following charts.
If your vehicle is not equipped with a heavy-duty trailer towing package, the maximum weight your vehicle can tow is limited to 5,000 lbs. (2,268 kg)
179
Driving
Your vehicle’s load capacity is designated by weight, not by volume, so you cannot necessarily use all available space when loading a vehicle. Towing a trailer places an additional load on your vehicle’s engine, transmission, axle, brakes, tires and suspension. Inspect these components carefully periodically during, and after any towing operation. Exceeding the maximum GCWR could result in extensive damage to your vehicle and personal injury.
⚠️ Do not exceed the GVWR or the GAWR specified on the certification label.
⚠️ Towing trailers beyond the maximum recommended gross trailer weight exceeds the limit of the vehicle and could result in engine damage, transmission damage, structural damage, loss of vehicle control, vehicle rollover and personal injury.
| Regular Cab 4x2 (126" wheelbase) | |||
|---|---|---|---|
| Engine | Rear axle ratio | Maximum GCWR-lbs. (kg) | Maximum trailer weight-lbs. (kg) |
| 4.6L | 3.55 | 11500 (5216) | 6500 (2948) |
| 4.6L | 3.73 | 12000 (5443) | 7000 (3175) |
| 5.4L | 3.31 | 12000 (5443) | 6800 (3084) |
| 5.4L (w/17" tires) | 3.55 | 13000 (5897) | 7800 (3538) |
| 5.4L (w/17" tires) | 3.73 | 13500 (6123) | 8300 (3765) |
180
Driving
Regular Cab 4x2 (145" wheelbase)
| Engine | Rear axle ratio | Maximum GCWR-lbs. (kg) | Maximum trailer weight-lbs. (kg) |
|---|---|---|---|
| 4.6L | 3.55 | 11700 (5307) | 6500 (2948) |
| 4.6L | 3.73 | 12200 (5534) | 7000 (3175) |
| 5.4L | 3.31 | 12500 (5670) | 7200 (3266) |
| 5.4L (w/17" tires) | 3.55 | 14000 (6350) | 8700 (3946) |
| 5.4L (w/17" tires) | 3.73 | 15000 (6804) | 9800 (4445) |
| 5.4L Heavy Duty | 4.10 | 15300 (6940) | 9900 (4491) |
Regular Cab 4x4 (126" wheelbase)
| Engine | Rear axle ratio | Maximum GCWR-lbs. (kg) | Maximum trailer weight-lbs. (kg) |
|---|---|---|---|
| 4.6L | 3.55 | 11500 (5216) | 6200 (2812) |
| 4.6L | 3.73 | 12000 (5443) | 6700 (3039) |
| 5.4L (w/17" tires) | 3.55 | 13000 (5897) | 7600 (3447) |
| 5.4L (w/18" tires) | 3.55 | 12500 (5670) | 7100 (3220) |
| 5.4L (w/17" tires) | 3.73 | 13500 (6123) | 8100 (3674) |
| 5.4L (w/18" tires) | 3.73 | 13000 (5897) | 7600 (3447) |
181
Driving
Regular Cab 4x4 (145" wheelbase)
| Engine | Rear axle ratio | Maximum GCWR-lbs. (kg) | Maximum trailer weight-lbs. (kg) |
|---|---|---|---|
| 4.6L | 3.55 | 11700 (5307) | 6200 (2812) |
| 4.6L | 3.73 | 12200 (5534) | 6700 (3039) |
| 5.4L (w/17" tires) | 3.55 | 14000 (6350) | 8500 (3856) |
| 5.4L (w/18" tires) | 3.55 | 13500 (6123) | 8000 (3629) |
| 5.4L (w/17" tires) | 3.73 | 15000 (6804) | 9500 (4309)* |
| 5.4L (w/18" tires) | 3.73 | 14500 (6577) | 9000 (4082) |
| 5.4L Heavy Duty | 4.10 | 15300 (6940) | 9500 (4309)* |
- Trailer tow capability is limited to 9500 lbs. (4309 kg)
SuperCab 4x2 (133" wheelbase)
| Engine | Rear axle ratio | Maximum GCWR-lbs. (kg) | Maximum trailer weight-lbs. (kg) |
|---|---|---|---|
| 4.6L | 3.55 | 11500 (5216) | 6300 (2858) |
| 4.6L | 3.73 | 12000 (5443) | 6800 (3084) |
| 5.4L (with 17" tires) | 3.55 | 13000 (5897) | 7600 (3447) |
| 5.4L (with 18" tires) | 3.55 | 12500 (5670) | 7100 (3220) |
| 5.4L (with 17" tires) | 3.73 | 13500 (6123) | 8100 (3674) |
| 5.4L (with 18" tires) | 3.73 | 13000 (5897) | 7600 (3447) |
182
Driving
SuperCab 4x2 (145" wheelbase)
| Engine | Rear axle ratio | Maximum GCWR-lbs. (kg) | Maximum trailer weight-lbs. (kg) |
|---|---|---|---|
| 4.6L | 3.55 | 11700 (5307) | 6300 (2858) |
| 4.6L | 3.73 | 12200 (5534) | 6800 (3084) |
| 5.4L (w/17" tires) | 3.55 | 14000 (6350) | 8500 (3856) |
| 5.4L (w/18" tires) | 3.55 | 13500 (6123) | 8000 (3629) |
| 5.4L (w/17" tires) | 3.73 | 15000 (6804) | 9500 (4309)* |
| 5.4L (w/18" tires) | 3.73 | 14500 (6577) | 9000 (4082) |
- Trailer tow capability is limited to 9500 lbs. (4309 kg)
SuperCab 4x2 (163" wheelbase)
| Engine | Rear axle ratio | Maximum GCWR-kg (lbs.) | Maximum trailer weight-kg (lbs.) |
|---|---|---|---|
| 5.4L Heavy Duty | 4.10 | 15300 (6940) | 9500 (4309) |
183
Driving
SuperCab 4x4 (133" wheelbase)
| Engine | Rear axle ratio | Maximum GCWR-lbs. (kg) | Maximum trailer weight-lbs. (kg) |
|---|---|---|---|
| 4.6L | 3.55 | 11500 (5216) | 5900 (2676) |
| 4.6L | 3.73 | 12000 (5443) | 6400 (2903) |
| 5.4L (w/17" tires) | 3.55 | 13000 (5897) | 7300 (3311) |
| 5.4L (w/18" tires) | 3.55 | 12500 (5670) | 6800 (3084) |
| 5.4L (w/17" tires) | 3.73 | 13500 (6123) | 7800 (3538) |
| 5.4L (w/18" tires) | 3.73 | 13000 (5897) | 7300 (3311) |
SuperCab 4x4 (145" wheelbase)
| Engine | Rear axle ratio | Maximum GCWR-lbs. (kg) | Maximum trailer weight-lbs. (kg) |
|---|---|---|---|
| 4.6L | 3.55 | 11700 (5307) | 6000 (2721) |
| 4.6L | 3.73 | 12200 (5534) | 6500 (2948) |
| 5.4L (w/17" tires) | 3.55 | 14000 (6350) | 8300 (3765) |
| 5.4L (w/18" tires) | 3.55 | 13500 (6123) | 7800 (3538) |
| 5.4L (w/17" tires) | 3.73 | 15000 (6804) | 9300 (4218) |
| 5.4L (w/18" tires) | 3.73 | 14500 (6577) | 8800 (3992) |
184
Driving
SuperCab 4x4 (163" wheelbase)
| Engine | Rear axle ratio | Maximum GCWR-lbs. (kg) | Maximum trailer weight-lbs. (kg) |
|---|---|---|---|
| 5.4L Heavy Duty | 4.10 | 15300 (6940) | 9300 (4218) |
Crew Cab 4x2 (139" wheelbase)
| Engine | Rear axle ratio | Maximum GCWR-lbs. (kg) | Maximum trailer weight-lbs. (kg) |
|---|---|---|---|
| 4.6L | 3.55 | 11700 (5307) | 6200 (2812) |
| 4.6L | 3.73 | 12200 (5534) | 6700 (3039) |
| 5.4L (w/17" tires) | 3.55 | 14000 (6350) | 8500 (3856) |
| 5.4L (w/18" tires) | 3.55 | 13500 (6123) | 8000 (3629) |
| 5.4L (w/17" tires) | 3.73 | 15000 (6804) | 9500 (4309)* |
| 5.4L (w/18" tires) | 3.73 | 14500 (6577) | 9000 (4082) |
- Trailer tow capability is limited to 9500 lbs. (4309 kg)
185
Driving
Crew Cab 4x4 (139" wheelbase)
| Engine | Rear axle ratio | Maximum GCWR-lbs. (kg) | Maximum trailer weight-lbs. (kg) |
|---|---|---|---|
| 4.6L | 3.55 | 11700 (5307) | 6000 (2721) |
| 4.6L | 3.73 | 12200 (5534) | 6500 (2948) |
| 5.4L (w/17" tires) | 3.55 | 14000 (6350) | 8200 (3719) |
| 5.4L (w/18" tires) | 3.55 | 13500 (6123) | 7700 (3493) |
| 5.4L (w/17" tires) | 3.73 | 15000 (6804) | 9200 (4173) |
| 5.4L (w/18" tires) | 3.73 | 14500 (6577) | 8700 (3946) |
Trailer frontal area considerations:
- Not to exceed towing vehicle frontal area without Class IV trailer towing package
- Not to exceed 60 square feet (5.52 square meters) with Class IV trailer towing package
Preparing to tow
Use the proper equipment for towing a trailer and make sure it is properly attached to your vehicle. See your dealer or a reliable trailer dealer if you require assistance.
Hitches
Do not use hitches that clamp onto the vehicle’s bumper or attach to the axle. You must distribute the load in your trailer so that 10%–15% of the total weight of the trailer is on the tongue.
Load equalizing hitch
When hooking up a trailer using a load equalizing hitch, always use the following procedure:
- Park the unloaded vehicle on a level surface. With the ignition on and all doors closed, allow the vehicle to stand for several minutes so that it can level.
186
Driving
- Measure the height of a reference point on the front and rear bumpers at the center of the vehicle.
- Attach the trailer to the vehicle and adjust the hitch equalizers so that the front bumper height is within 1/2" (13 mm) of the reference point. After proper adjustment, the rear bumper should be no higher than in Step 2.
Note: Adjusting an equalizing hitch so the rear bumper of the vehicle is higher than it was unloaded will defeat the function of the load equalizing hitch and may cause unpredictable handling.
Safety chains
Always connect the trailer's safety chains to the frame or hook retainers of the vehicle hitch. To connect the trailer's safety chains, cross the chains under the trailer tongue and allow slack for turning corners.
If you use a rental trailer, follow the instructions that the rental agency gives to you.
Do not attach safety chains to the bumper.
Trailer brakes
Electric brakes and manual, automatic or surge-type trailer brakes are safe if installed properly and adjusted to the manufacturer's specifications. The trailer brakes must meet local and Federal regulations.

The braking system of the tow vehicle is rated for operation at the GVWR not GCWR.
Trailer lamps
Trailer lamps are required on most towed vehicles. Make sure all running lights, brake lights, turn signals and hazard lights are working. See your dealer or trailer rental agency for proper instructions and equipment for hooking up trailer lamps.
Using a step bumper (if equipped)
The rear bumper is equipped with an integral hitch and only requires a ball with a one inch (25.4 mm) shank diameter. The bumper has a 5,000 lbs. (2,270 kg) trailer weight and 500 lbs. (227 kg) tongue weight capacity.
187
Driving
If it is necessary to relocate the trailer hitch ball position, a frame-mounted trailer hitch must be installed.
Driving while you tow
When towing a trailer:
- Turn off the speed control. The speed control may shut off automatically when you are towing on long, steep grades.
- Consult your local motor vehicle speed regulations for towing a trailer.
- To eliminate excessive shifting, use a lower gear. This will also assist in transmission cooling. (For additional information, refer to the Understanding the positions of the 4-speed automatic transmission section in this chapter.
- Anticipate stops and brake gradually.
- Do not exceed the GCWR rating or transmission damage may occur.
Servicing after towing
If you tow a trailer for long distances, your vehicle will require more frequent service intervals. Refer to your Scheduled Maintenance Guide for more information.
Trailer towing tips
- Practice turning, stopping and backing up before starting on a trip to get the feel of the vehicle trailer combination. When turning, make wider turns so the trailer wheels will clear curbs and other obstacles.
- Allow more distance for stopping with a trailer attached.
- The trailer tongue weight should be 10–15% of the loaded trailer weight.
- After you have traveled 50 miles (80 km), thoroughly check your hitch, electrical connections and trailer wheel lug nuts.
- To aid in engine/transmission cooling and A/C efficiency during hot weather while stopped in traffic, place the gearshift lever in P (Park) (automatic transmission) or N (Neutral) (manual transmissions).
- Vehicles with trailers should not be parked on a grade. If you must park on a grade, place wheel chocks under the trailer's wheels.
Launching or retrieving a boat
Disconnect the wiring to the trailer before backing the trailer into the water. Reconnect the wiring to the trailer after the trailer is removed from the water.
188
Driving
When backing down a ramp during boat launching or retrieval:
- do not allow the static water level to rise above the bottom edge of the rear bumper.
- do not allow waves to break higher than 6 inches (15 cm) above the bottom edge of the rear bumper.
Exceeding these limits may allow water to enter vehicle components:
- causing internal damage to the components.
- affecting driveability, emissions and reliability.
Replace the rear axle lubricant any time the axle has been submerged in water. Rear axle lubricant quantities are not to be checked or changed unless a leak is suspected or repair required.
RECREATIONAL TOWING (ALL WHEELS ON THE GROUND)
An example of recreational towing would be towing your vehicle behind a motorhome. Follow these guidelines if you have the need for recreational towing your vehicle with all four wheels on the ground. These guidelines are designed to ensure that your transmission is not damaged.
2WD vehicles:
- Place the transmission in N (Neutral)
- Maximum speed is 35 mph (56 km)
- Maximum distance is 50 miles (80 km)
If a distance of 50 miles (80 km) or a speed of 35 mph (56 km) must be exceeded, the drive shaft will have to be removed before the vehicle is towed.
Ford recommends the driveshaft be removed/installed only by a qualified technician. See your local dealer for driveshaft removal/installation.
Improper removal/installation of the driveshaft can cause transmission fluid loss, damage to the driveshaft and internal transmission components.
4WD vehicles electronic shift transfer case: 4x4 vehicles with electronic shift on the fly cannot be towed with any wheels on the ground.
189
Driving
SNOWPLOWING
Ford recommends that the F-150 used for snow removal include the Snow Plow Prep Package Option. The option is available for F-150 4x4 Regular Cab and Super Cab (not available or recommended for SuperCrew), and includes the following upgrades:
- F-150 4x4 (except F-150 SuperCrew)
- 5.4L engine
- Heavy-duty payload package
- Snowplow prep package
SNOWPLOWING
For F-150 snowplow applications, Ford recommends the F-150 4x4 Regular Cab and SuperCab equipped with the 5.4L engine, Heavy Duty Payload Package and Snow Plow Prep Package. F-150 SuperCrew is not available, or recommended, for snowplowing.
Installing the snowplow
Weight limits and guidelines for selecting and installing the snowplow can be found in the Ford Truck Body Builders Layout Book, Snowplow section, found at www.fleet.ford.com/truckbbas. A typical installation affects the following:
- Certification to government safety laws such as occupant protection and air bag deployment, braking, and lighting. Look for an "Alterer's Label" on the vehicle from the snowplow installer certifying that the installation meets all applicable Federal Motor Vehicle Safety Standards (FMVSS).
- The Total Accessory Reserve Capacity (TARC) is shown on the lower right side of the vehicle's Safety Certification Label. This is the weight of permanently-attached auxiliary equipment, such as snowplow frame-mounting hardware, that can be added to the vehicle and satisfy Ford compliance certification to FMVSS. Exceeding this weight may require the auxiliary equipment installer additional safety certification responsibility. The Front Accessory Reserve Capacity (FARC) is added for customer convenience
- Rear ballast weight behind the rear axle may be required to prevent exceeding the FGAWR, and provide front-to-rear weight balance for proper braking and steering.
- Front wheel toe may require re-adjustment to prevent premature uneven tire wear. Specifications are found in the Ford Workshop Manual.
190
Driving
- Headlight aim may require re-adjustment.
- The tire air pressures recommended for general driving are found on the vehicle's Safety Certification Label. The maximum cold inflation pressure for the tire and associated load rating is imprinted on the tire sidewall. Tire air pressure may require re-adjustment within these pressure limits to accommodate the additional weight of the snowplow installation
Operating the vehicle with the snowplow attached
Ford recommends that the F-150 be limited to low speed, personal-use snow removal. Do not use your vehicle for snow removal until it has been driven at least 500 miles (800 km).
The attached snowplow blade restricts airflow to the radiator, and may cause the engine to run at a higher temperature:
- If you are driving more than 15 miles (24 km) where outside air temperatures are above freezing, then angle the plow blade to full left or right to maximize airflow to the radiator.
- If you are driving less than 15 miles (24 km) at speeds up to 40 mph (64 km/h) in cold weather you will not need to adjust blade position
Snowplowing with your air bag equipped vehicle
Your vehicle is equipped with a driver and passenger air bag Supplemental Restraint System (SRS) The SRS is designed to activate in certain frontal and offset frontal collisions when the vehicle sustains sufficient longitudinal deceleration.
Careless or high speed driving while plowing snow which results in sufficient vehicle decelerations can deploy the air bag. Such driving also increases the risk of accidents.
All occupants of the vehicle, including the driver, should always properly wear their safety belts, even when an air bag supplemental restraint system (SRS) is provided.
Never remove or defeat the "tripping mechanisms" designed into the snow removal equipment by its manufacturer. Doing so may cause damage to the vehicle and the snow removal equipment as well as possible air bag deployment.
191
Driving
! Do not attempt to service, repair, or modify the air bag supplemental restraint system (SRS) or its fuses. See your Ford or Lincoln Mercury dealer.
Transmission operation while plowing
- Shift transfer case to 4L (4WD Low) when plowing in small areas at speeds below 5 mph (8 km/h).
- Shift transfer case to 4H (4WD High) when plowing larger areas or light snow at higher speeds. Do not exceed 15 mph (24 km/h).
- Do not shift the transmission from a forward gear to R (Reverse) until the engine is at idle and the wheels are stopped.
- If the vehicle is stuck, shift the transmission in a steady motion between forward and reverse gears. Do not rock the vehicle for more than a few minutes. The transmission and tires may be damaged or the engine can overheat.
Do not rock the vehicle if the engine is not at operating temperature. Do not rock the vehicle for more than a minute. The transmission and tires may be damaged or the engine may overheat.
! Do not spin the wheels at over 35 mph (55 km/h). The tires may fail and injure a passenger or bystander.
Engine temperature while plowing
When driving with a plow, your engine may run at a higher temperature than normal because the attached snowplow blade will restrict airflow to the radiator.
If you are driving more than 15 miles (24 km) at temperatures above freezing, angle the plow blade either full left or full right to provide maximum airflow to the radiator.
If you are driving less than 15 miles (24 km) at speeds up to 40 mph (64 km/h) in cold weather, you will not need to worry about blade position to provide maximum airflow.
192
Roadside Emergencies
GETTING ROADSIDE ASSISTANCE
To fully assist you should you have a vehicle concern, Ford Motor Company offers a complimentary roadside assistance program. This program is separate from the New Vehicle Limited Warranty. The service is available:
- 24-hours, seven days a week
- for the New Vehicle Limited Warranty period of three years or 36,000 miles (60,000 km), whichever occurs first on Ford and Mercury vehicles, and four years or 50,000 miles (80,000 km) on Lincoln vehicles.
Roadside assistance will cover:
- changing a flat tire
- jump-starts
- lock-out assistance
- limited fuel delivery
- towing of your disabled vehicle to the nearest Ford Motor Company dealership, or your selling dealer if within 35 miles (56.3 km) of the nearest Ford Motor Company dealership (one tow per disablement). Even non-warranty related tows, like accidents or getting stuck in the mud or snow, are covered (some exclusions apply, such as impound towing or repossession).
Canadian customers refer to your Owner Information Guide for information on:
- coverage period
- exact fuel amounts
- towing of your disabled vehicle
- emergency travel expense reimbursement
- travel planning benefits
USING ROADSIDE ASSISTANCE
Complete the roadside assistance identification card and place it in your wallet for quick reference. In the United States, this card is found in the Owner Guide portfolio in the glove compartment in Ford vehicles and is mailed to you if you own a Mercury or Lincoln. In Canada, the card is found in the Owner Information Guide in the glove compartment.
U.S. Ford or Mercury vehicle customers who require roadside assistance, call 1–800–241–3673; Lincoln vehicle customers call 1–800–521–4140.
193
Roadside Emergencies
Canadian customers who require roadside assistance, call 1–800–665–2006.
If you need to arrange roadside assistance for yourself, Ford Motor Company will reimburse a reasonable amount. To obtain reimbursement information, U.S. Ford or Mercury vehicles customers call 1-800-241-3673; Lincoln vehicle customers call 1–800–521–4140.
Canadian customers who need to obtain reimbursement information, call 1–800–665–2006.
ROADSIDE COVERAGE BEYOND BASIC WARRANTY
In the United States, you may purchase additional roadside assistance coverage beyond this period through the Ford Auto Club by contacting your Ford or Lincoln Mercury dealer.
Similarly in Canada, for uninterrupted Roadside Assistance coverage, you may purchase extended coverage prior to your Basic Warranty’s Roadside Assistance expiring. For more information and enrollment, contact 1–877–294–2582 or visit our website at www.ford.ca.
HAZARD FLASHER ⚠
The hazard flasher is located on the steering column, just behind the steering wheel. The hazard flashers will operate when the ignition is in any position or if the key is not in the ignition.
Push in the flasher control and all front and rear direction signals will flash. Press the flasher control again to turn them off. Use it when your vehicle is disabled and is creating a safety hazard for other motorists.
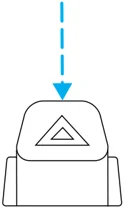
Note: With extended use, the flasher may run down your battery.
FUEL PUMP SHUT-OFF SWITCH
This device stops the electric fuel pump from sending fuel to the engine when your vehicle has had a substantial jolt.
After an accident, if the engine cranks but does not start, this switch may have been activated.
194
Roadside Emergencies
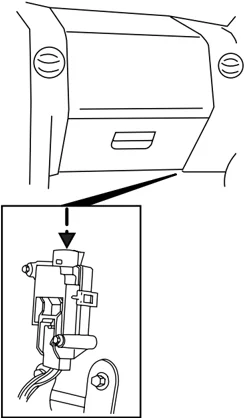
This switch is located in the front passenger's footwell, behind the kick panel access cover, in front of the fuse box. The access cover needs to be removed to reset the fuel pump shut-off switch.
To reset the switch:
- Turn the ignition OFF.
- Check the fuel system for leaks.
- If no leaks are apparent, reset the switch by pushing in on the reset button.
- Turn the ignition ON.
- Wait a few seconds and return the key to OFF.
- Make another check for leaks.
FUSES AND RELAYS
Fuses
If electrical components in the vehicle are not working, a fuse may have blown. Blown fuses are identified by a broken wire within the fuse. Check the appropriate fuses before replacing any electrical components.
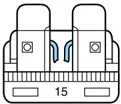
Note: Always replace a fuse with one that has the specified amperage rating. Using a fuse with a higher amperage rating can cause severe wire damage and could start a fire.
195
Roadside Emergencies
Standard fuse amperage rating and color
\begin{tabular}{|l|l|l|l|l|l|} \hline \multicolumn{6}{|c|}{COLOR} \ \hline \textbf{Fuse rating} & \textbf{Mini fuses} & \textbf{Standard fuses} & \textbf{Maxi fuses} & \textbf{Cartridge maxi fuses} & \textbf{Fuse link cartridge} \ \hline 2A & Grey & Grey & — & — & — \ \hline 3A & Violet & Violet & — & — & — \ \hline 4A & Pink & Pink & — & — & — \ \hline 5A & Tan & Tan & — & — & — \ \hline 7.5A & Brown & Brown & — & — & — \ \hline 10A & Red & Red & — & — & — \ \hline 15A & Blue & Blue & — & — & — \ \hline 20A & Yellow & Yellow & Yellow & Blue & Blue \ \hline 25A & Natural & Natural & — & — & — \ \hline 30A & Green & Green & Green & Pink & Pink \ \hline 40A & — & — & Orange & Green & Green \ \hline 50A & — & — & Red & Red & Red \ \hline 60A & — & — & Blue & — & Yellow \ \hline 70A & — & — & Tan & — & Brown \ \hline 80A & — & — & Natural & — & Black \ \hline \end{tabular}
Passenger compartment fuse panel / power distribution box The fuse panel is located under the right-hand side of the instrument panel. Remove the trim panel and fuse box cover to access the fuses.
To remove the fuse box cover, place a finger behind the PULL tab and your thumb above the PULL tab as shown in the illustration, then pull the cover off.
 PULL
To reinstall the fuse box cover, place the top part of the cover on the fuse panel, then push the bottom part of the cover until you hear it click shut. Gently pull on the cover to make sure it is seated properly.
196
Roadside Emergencies
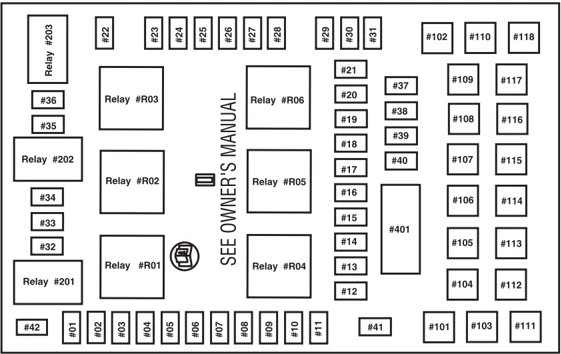
The fuses are coded as follows.
| Fuse/Relay Location | Fuse Amp Rating | Passenger Compartment Fuse Panel Description |
|---|---|---|
| 1 | 10A* | Run/Accessory - Wipers, Instrument cluster |
| 2 | 20A* | Stop/Turn lamps, Speed control deactivate switch |
| 3 | 5A* | Power mirrors, Memory logic power, Memory seats and pedals |
| 4 | 10A* | DVD battery power |
| 5 | 7.5A* | Keep alive memory for Powertrain Control Module (PCM) and climate control module |
| 6 | 15A* | Parklamps, BSM, Instrument panel illumination |
| 7 | 5A* | Radio (start signal) |
| 8 | 10A* | Heated mirrors, Switch indicator |
| 9 | — | Not used |
197
Roadside Emergencies
| Fuse/Relay Location | Fuse Amp Rating | Passenger Compartment Fuse Panel Description |
|---|---|---|
| 10 | 20A* | Trailer tow back-up lamps relay (PCB1), Trailer tow parklamp relay (R201) |
| 11 | 10A* | A/C clutch, 4x4 solenoid |
| 12 | — | Not used |
| 13 | 10A* | Climate control module power |
| 14 | 10A* | Back-up lamp and Daytime Running Lamps (DRL) relay coil, A/C pressure switch, Brake-shift interlock solenoid, Heated PCV |
| 15 | 5A* | Overdrive cancel, Cluster, Brake-Shift Interlock (BSI) |
| 16 | 10A* | ABS module (Run/Start power) |
| 17 | 15A* | Fog lamp relay (R202) |
| 18 | 10A* | Run/Start feed - Flasher relay, Electrochromatic mirror, Heated seats, BSM, Compass, RSS (Reverse Sensing System) |
| 19 | 10A* | Restraints (Air bag module) |
| 20 | 15A* | PCM 4x4 power |
| 21 | 15A* | Cluster keep alive power |
| 22 | 10A* | Delayed accessory power for audio, power door lock switch and moonroof switch illumination |
| 23 | 10A* | RH low beam headlamp |
| 24 | 15A* | Battery saver power for demand lamps |
| 25 | 10A* | LH low beam headlamp |
| 26 | 20A* | Horn relay (PCB3), Horn power |
198
Roadside Emergencies
| Fuse/Relay Location | Fuse Amp Rating | Passenger Compartment Fuse Panel Description |
|---|---|---|
| 27 | 5A* | Passenger Air bag Deactivation (PAD) warning lamp, Cluster air bag warning lamp, Cluster RUN /START power |
| 28 | 5A* | SecuriLock transceiver (PATS) |
| 29 | 15A* | PCM 4x4 power |
| 30 | — | Not used |
| 31 | 20A* | Radio power |
| 32 | 15A* | Vapor Management Valve (VMV), A/C clutch relay, Canister vent, Heated Exhaust Gas Oxygen (HEGO) sensors #11 and #21, CMCV, Mass Air Flow (MAF) sensor, VCT |
| 33 | 15A* | Shift solenoid, CMS #12 and #22 |
| 34 | 20A* | Fuel injectors and PCM power |
| 35 | 20A* | Instrument cluster high beam indicator, High beam headlamps |
| 36 | 10A* | Trailer tow right turn/stop lamps |
| 37 | 20A* | Rear power point |
| 38 | 25A* | Subwoofer power |
| 39 | 20A* | Instrument panel power point |
| 40 | 20A* | Low beam headlamps, DRL |
| 41 | 20A* | Cigar lighter, Diagnostic connector power |
| 42 | 10A* | Trailer tow left turn/stop lamps |
| 101 | 30A** | Starter solenoid |
| 102 | 20A** | Ignition switch feed |
| 103 | 20A** | ABS valves |
| 104 | — | Not used |
| 105 | 30A** | Electric trailer brakes |
| 106 | 30A** | Trailer tow battery charge |
199
Roadside Emergencies
| Fuse/Relay Location | Fuse Amp Rating | Passenger Compartment Fuse Panel Description |
|---|---|---|
| 107 | 30A** | Power door locks (BSM) |
| 108 | 30A** | Passenger power seat |
| 109 | 30A** | Driver power seat, Adjustable pedals |
| 110 | — | Not used |
| 111 | 30A** | 4x4 relays |
| 112 | 40A** | ABS pump power |
| 113 | 30A** | Wipers and washer pump |
| 114 | 40A** | Heated backlite, Heated mirror power |
| 115 | — | Not used |
| 116 | 30A** | Blower motor |
| 117 | — | Not used |
| 118 | 30A** | Heated seats |
| 401 | 30A Circuit breaker | Power windows, Moonroof, Power sliding backlite |
| R01 | Full ISO relay | Starter solenoid |
| R02 | Full ISO relay | Accessory delay |
| R03 | Full ISO relay | Hi-beam headlamps |
| R04 | Full ISO relay | Heated backlite |
| R05 | Full ISO relay | Trailer tow battery charge |
| R06 | Full ISO relay | Blower motor |
| R201 | Half ISO relay | Trailer tow park lamps |
| R202 | Half ISO relay | Fog lamps |
| R203 | Half ISO relay | PCM |
| * Mini fuses ** Cartridge fuses |
200