Locks and Security
KEYS
The key operates all locks on your vehicle. In case of loss, replacement keys are available from your dealer.
You should always carry a second key with you in a safe place in case you require it in an emergency.
Refer to SecuriLock® Passive Anti-Theft System for more information.
POWER DOOR LOCKS (IF EQUIPPED)
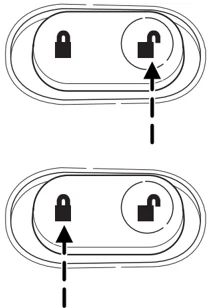
The power door lock controls are located on the driver and front passenger door panels.
Press control to unlock all vehicle doors.
Press control to lock all vehicle doors.
Smart unlocking feature
The smart unlocking feature prevents you from locking yourself out of your vehicle.
With the key in any ignition position:
- The driver’s door will automatically unlock if it is locked by the driver’s power lock control while the driver’s door is open.
The vehicle may still be locked with the key in the ignition, and performing one of the following actions:
- Pressing the manual lock button on the door.
- Operating the remote entry transmitter.
- Operating the keyless entry keypad.
- Operating the driver’s door with a key.
84
Locks and Security
Childproof door locks (if equipped)
- When these locks are set, the rear doors cannot be opened from the inside.
- The rear doors can be opened from the outside when the doors are unlocked.
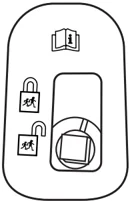
The childproof locks are located on rear edge of each rear door and must be set separately for each door. Setting the lock for one door will not automatically set the lock for both doors.
- Move lock control up to engage the childproof lock.
- Move control down to disengage childproof locks.
REMOTE ENTRY SYSTEM (IF EQUIPPED)
This device complies with part 15 of the FCC rules and with RS-210 of Industry Canada. Operation is subject to the following two conditions: (1) This device may not cause harmful interference, and (2) This device must accept any interference received, including interference that may cause undesired operation.
Changes or modifications not expressly approved by the party responsible for compliance could void the user's authority to operate the equipment.
The typical operating range for your remote entry transmitter is approximately 33 feet (10 meters). A decrease in operating range could be caused by:
- weather conditions,
- nearby radio towers,
- structures around the vehicle, or
- other vehicles parked next to your vehicle.
85
Locks and Security
Your vehicle is equipped with a remote entry system which allows you to:
- unlock the vehicle doors without a key.
- lock all the vehicle doors without a key.
- activate the personal alarm.
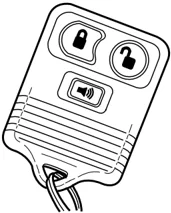
If there is any potential remote keyless entry problem with your vehicle, ensure ALL remote entry transmitters are taken to the dealership, to aid in troubleshooting.
Unlocking the doors
- Press and release to unlock the driver’s door. Note: The interior lamps will illuminate.
- Press and release again within three seconds to unlock all the doors.
Locking the doors
- Press and release to lock all the doors. The parklamps will flash.
- Press and release again within three seconds to confirm that all the doors are closed and locked. Note: The doors will lock again, the horn will chirp once, and the parklamps will flash once more.
If any of the doors are not properly closed the horn will make two quick chirps and the parklamps will not flash.
Power door lock/unlock disable feature (if equipped)
The (lock) and (unlock) features on your power door locks will not work from inside the vehicle when:
- the ignition has been turned to the 1 (OFF/LOCK) position, and
- 20 seconds elapse after all vehicle doors are closed and locked using the remote entry transmitter, the keyless entry pad, or the power door lock control (while the accompanying door is open).
86
Locks and Security
The (lock) and (unlock) features will work again after:
- a door has become ajar,
- the ignition is turned to the 3 (ON) position, or
- using the UNLOCK control on your remote entry transmitter or unlocking via the keyless entry keypad.
Deactivating/activating power door lock/unlock disable feature
All vehicle doors must be closed before beginning the procedure. You must complete Steps 1–5 within 30 seconds, or the procedure will have to be repeated. If the procedure needs to be repeated, you must wait a minimum of 30 seconds to begin again.
-
Turn the ignition to the 3 (ON) position, then press the button three times.
-
Turn the ignition to the 1 (OFF/LOCK) position, then press the button three times.
-
Turn the ignition to the 3 (ON) position, and within five seconds, press the button two times. Note: After turning the ignition to the 3 (ON) position, two horn chirps should be heard, indicating that the system has been disabled. Conversely, two horn chirps followed by a honk will indicate that the system is enabled.
-
Pressing the power door button two times again will turn the feature ON if it was previously OFF, or OFF if it was previously ON. Every two consecutive presses of the button after successfully entering the configuration mode will change the enable/disable condition of the feature.
-
Turn the ignition to the 1 (OFF/LOCK) position to exit programming.
Note: After exiting the driver configuration mode, the horn will chirp once to indicate a feature has been activated/deactivated.
Sounding a panic alarm
Press to activate the alarm. Press again or turn the ignition to 2 (ACCESSORY) or 3 (ON) to deactivate.
Note: The panic alarm will only operate when the ignition is in the 1 (OFF/LOCK) position.
87
Locks and Security
Memory feature (if equipped)
The remote entry system can also control the memory feature.
Press the [icon] control once to unlock the driver's door. Pressing the [icon] control will automatically move the seat and adjustable pedals to the desired memory position (the memory position corresponds to the transmitter being used).
Activating the memory feature
To activate this feature:
- Position the seat and adjustable pedals to the positions you desire.
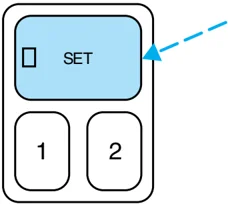
- Press the SET control on the driver's seat.
- Within 5 five seconds, press one control on the remote transmitter and then press the 1 or 2 control on the driver's door panel to which you would like to associate with Driver 1 or Driver 2 positions.
- Repeat this procedure for another remote transmitter if desired.
Deactivating the memory feature
To deactivate this feature:
- Press the SET control on the driver's door seat.
- Within 5 five seconds, press any control on the remote transmitter which you would like to deactivate and then press the SET control on the driver's door panel.
- Repeat this procedure for another remote transmitter if desired.
Replacing the battery
The remote entry transmitter uses one coin type three-volt lithium battery CR2032 or equivalent.
Locks and Security
To replace the battery:
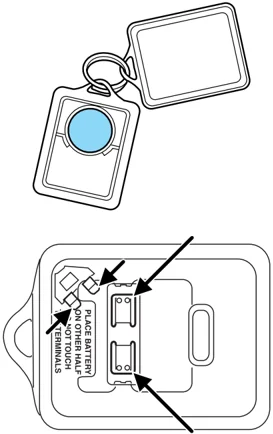
- Twist a thin coin between the two halves of the remote entry transmitter near the key ring. DO NOT TAKE THE RUBBER COVER AND CIRCUIT BOARD OFF THE FRONT HOUSING OF THE REMOTE ENTRY TRANSMITTER.
-
Do not wipe off any grease on the battery terminals on the back surface of the circuit board.
-
Remove the old battery. Note: Please refer to local regulations when disposing of transmitter batteries.
-
Insert the new battery. Refer to the diagram inside the remote entry transmitter for the correct orientation of the battery. Press the battery down to ensure that the battery is fully seated in the battery housing cavity.
-
Snap the two halves back together.
Note: Replacement of the battery will not cause the remote transmitter to become deprogrammed from your vehicle. The remote transmitter should operate normally after battery replacement.
Replacing lost transmitters
If a remote transmitter has been lost and you would like to remove it from the vehicle's memory, or you would like to purchase additional remote transmitters and have them programmed to your vehicle:
• Take all your vehicle's transmitters to your dealer for programming, or
• Perform the programming procedure yourself.
89
Locks and Security
Programming remote transmitters
It is necessary to have all (maximum of six — original and/or new) of your remote transmitters available prior to beginning this procedure. If all remote entry transmitters are not present during the programming procedure, the transmitters that are not present during programming will no longer operate the vehicle. Note: Do not press the brake pedal anytime during this sequencing, as doing so will invalidate the procedure.
To program the transmitters yourself:
- Unlock all doors using the power door lock/unlock control. Insert a key and turn the ignition from the 1 (OFF/LOCK) to the 3 (ON) position and cycle between 1 (OFF/LOCK) and 3 (ON) eight times in rapid succession (within 10 seconds) with the eighth turn ending in the 3 (ON) position. The locks will cycle to confirm that the programming mode has been entered.
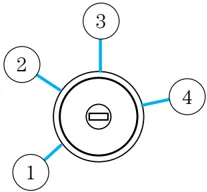
- Within 20 seconds, program a remote transmitter by pressing any button on a transmitter. The locks will cycle once to confirm that the remote transmitter has been programmed. (If more than 20 seconds pass before pressing a remote transmitter button, the programming mode will exit and the procedure will have to be repeated.)
- Repeat the previous step to program additional remote transmitters. The locks will cycle once to confirm that each remote transmitter has been programmed.
- When you have completed programming the remote transmitters, turn the ignition to the 1 (OFF/LOCK) position or wait 20 seconds. Again the doors will lock/unlock to confirm programming has been completed.
I lluminated entry
The interior lamps illuminate when the remote entry system is used to unlock the door(s) or sound the personal alarm.
The illuminated entry system will turn off the interior lights if:
- the ignition switch is turned to the 3 (ON) position, or
- the remote transmitter lock control is pressed, or
- after 25 seconds of illumination.
90
Locks and Security
The dome lamp control (if equipped) must not be set to the off position for the illuminated entry system to operate.
The inside lights will not turn off if:
- they have been turned on with the dimmer control, or
- any door is open.
The battery saver will shut off the interior lamps 30 minutes after the last door is closed, even if the dimmer control is on.
Perimeter lighting feature (if equipped)
The perimeter lighting feature illuminates the exterior of the vehicle in order to provide better visibility to the user while he or she approaches and enters the vehicle.
The perimeter lighting feature activates when:
- the ignition is in the 1 (OFF/LOCK) position,
- the autolamp sensor determines that it is dark, and
- the user activates an unlock feature, using either the remote keyless transmitter or the keypad.
The perimeter lighting feature will illuminate the headlamps and parking lamps for 25 seconds, or until:
- the ignition is turned to any position other than the 1 (OFF/LOCK) position, or
- the user activates a lock feature, using either the remote keyless transmitter or the keypad.
Enabling/disabling the perimeter lighting feature
Your vehicle comes with the perimeter lighting feature enabled. All vehicle doors must be closed before beginning the procedure. You must complete Steps 1–5 within 30 seconds, or the procedure will have to be repeated. If the procedure needs to be repeated, you must wait a minimum of 30 seconds to begin again.
-
Turn the ignition to the 3 (ON) position, then press the [lock icon] control three times.
-
Turn the ignition to the 1 (OFF/LOCK) position, then press the [unlock icon] control three times.
-
Turn the ignition to the 3 (ON) position, and within five seconds, press the [lock icon] control two times. Note: After turning the ignition to the 3 (ON) position, two horn chirps should be heard, indicating that the
91
Locks and Security
system has been disabled. Conversely, two horn chirps followed by a honk will indicate that the system is enabled.
-
Pressing the power door control two times again will turn the feature ON if it was previously OFF, or OFF if it was previously ON. Every two consecutive presses of the control after successfully entering the configuration mode will change the enable/disable condition of the feature.
-
Turn the ignition to the 1 (OFF/LOCK) position to exit programming. Note: After exiting the driver configuration mode, the horn will chirp once to indicate a feature has been activated/deactivated.
Autolock (if equipped)
The autolock feature will lock all the doors when:
- all the doors are closed,
- the ignition is in the 3 (ON) position,
- you shift into any gear putting the vehicle in motion, and
- the brake pedal is released and the vehicle attains a speed greater than 5 mph (8 km/h).
The autolock feature repeats when:
- any door is opened then closed while the ignition is in the 3 (ON) position, and
- the brake pedal is released and the vehicle attains a speed greater than 5 mph (8 km/h).
Deactivating/activating autolock
Your vehicle comes with the autolock feature activated. There are three methods to enable/disable this feature: One is through your dealer, the second with a power door unlock/lock sequence and the third with the keypad.
Before following the activation or deactivation procedures, make sure the ignition is off, and all vehicle doors are closed.
92
Locks and Security
Power door unlock/lock procedure
You must complete Steps 1–5 within 30 seconds, or the procedure will have to be repeated. If the procedure needs to be repeated, you must wait a minimum of 30 seconds to begin again.
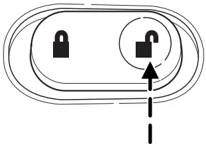
- Turn the ignition to the 3 (ON) position, then press the control three times.
- Turn the ignition to the 1 (OFF/LOCK) position, then press the control three times.
- Turn the ignition to the 3 (ON) position, and within five seconds, press the control two times. Note: After turning the ignition to the 3 (ON) position, two horn chirps should be heard, indicating that the system has been disabled. Conversely, two horn chirps followed by a honk will indicate that the system is enabled.
- Press the unlock control, then press the lock control. The horn will chirp once if autolock was deactivated or twice (one short and one long chirp) if autolock was activated.
- Turn the ignition to the 1 (OFF/LOCK) position to exit programming. Note: After exiting the driver configuration mode, the horn will chirp once to indicate a feature has been activated/deactivated.
Keyless entry key pad procedure
- Turn the ignition to the 1 (OFF/LOCK) position.
- Close all the doors.
- Enter 5-digit entry code
- Press and hold the 7 • 8. While holding the 7 • 8 press the 3 • 4.
- Release the 3 • 4.
- Release the 7 • 8.
The user should receive a horn chirp to indicate the system has been disabled or a chirp followed by a honk to indicate the system has been enabled.
93
Locks and Security
KEYLESS ENTRY SYSTEM (IF EQUIPPED)
You can use the keyless entry keypad to:
- lock all vehicle doors.
- unlock only the driver’s door.
- unlock all vehicle doors.
- program/erase the customer keycode.
- enable/disable the autolocking feature.
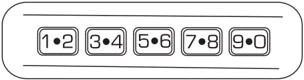
The keypad can be operated with the factory set 5-digit entry code; this code is located on the owner’s wallet card in the glove box, is marked on the computer module, and is available from your authorized dealer. You can also create your own 5-digit personal entry code.
When pressing the controls on the keypad, press the middle of the controls to ensure a good activation.
Programming a personal entry code
To create your own personal entry code:
- Enter the factory set code (keypad will illuminate when pressed).
- Within five seconds press the 1 • 2 on the keypad.
- Enter your personal 5-digit code. Each number must be entered within five seconds of each other.
- After the code is entered, the locks will cycle, confirming that the new code has been set.
Tips:
- Do not set a code that uses five of the same number.
- Do not use five numbers in sequential order.
- The factory set code will work even if you have set your own personal code.
- If you set a second personal code it will erase your first personal code.
Erasing personal code
- Enter the factory set 5-digit code.
- Press and release 1 • 2 then,
- Press and hold the 1 • 2 for two seconds. This must be done within five seconds of completing Step 1.
94
Locks and Security
Your personal code is now erased and only the factory set 5-digit code will work.
Antiscan feature
The keyless entry keypad is equipped with an anti-theft function called "antiscan." The antiscan feature provides a one-minute lockout feature, where the user is unable to enter the vehicle using the keypad; this lockout occurs when a valid entry code has not been entered by the user within 7 attempts (35 consecutive button presses). During the lockout, the keypad will flash and pressing the controls on the keypad will be ignored, except for pressing the 7 • 8 and the 9 • 0 controls simultaneously, which will still lock the vehicle.
The antiscan feature will be turned off after:
• one minute, when the antiscan feature times out.
• one minute of keypad inactivity.
• the control is pressed on the remote entry transmitter.
• the ignition is turned from the 1 (OFF/LOCK) position to the 3 (ON) position, or from the 3 (ON) position to the 1 (OFF/LOCK) position.
Unlocking and locking the doors using keyless entry keypad
To unlock the driver's door, enter the factory set 5-digit code or your personal code. Each number must be pressed within five seconds of each other. The interior lamps will illuminate after pressing the first control on the keypad.
To unlock all doors, press the 3 • 4 control within five seconds.
To lock all doors, press the 7 • 8 and the 9 • 0 at the same time. You do not need to enter the keypad code first. Note: The interior lamps will turn off.
SECURILOCK™ PASSIVE ANTI-THEFT SYSTEM
SecuriLock™ passive anti-theft system is an engine immobilization system. This system is designed to prevent the engine from being started unless a coded key programmed to your vehicle is used. The use of the wrong type of coded key may lead to a "no-start" condition.
Your vehicle comes with two coded keys; additional coded keys may be purchased from your dealer. The dealer can program your spare keys to your vehicle or you can program the keys yourself. Refer to Programming spare keys for instructions on how to program the coded key.
95
Locks and Security
Note: The SecuriLock™ passive anti-theft system is not compatible with non-Ford aftermarket remote start systems. Use of these systems may result in vehicle starting problems and a loss of security protection.
Note: Large metallic objects, electronic devices that are used to purchase gasoline or similar items, or a second coded key on the same key chain may cause vehicle starting issues. You need to prevent these objects from touching the coded key while starting the engine. These objects will not cause damage to the coded key, but may cause a momentary issue if they are too close to the key when starting the engine. If a problem occurs, turn the ignition off, remove all objects on the key chain away from the coded key and restart the engine.
Theft indicator
The theft indicator is located on top of the instrument panel.
- When the ignition is in the 1 (OFF/LOCK) position, the indicator will flash once every 2 seconds to indicate the SecuriLock™ system is functioning as a theft deterrent.
- When the ignition is in the 3 (ON) position, the indicator will glow for 3 seconds to indicate normal system functionality.
If a problem occurs with the SecuriLock™ system, the indicator will flash rapidly or glow steadily when the ignition is in the 3 (ON) position. If this occurs, the vehicle should be taken to an authorized dealer for service.
Automatic arming
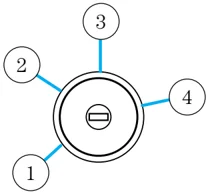
The vehicle is armed immediately after switching the ignition to the 1 (OFF/LOCK) position.
Automatic disarming
Switching the ignition to the 3 (ON) position with a coded key disarms the vehicle.
96
Locks and Security
Replacement keys
If your keys are lost or stolen and you don’t have an extra coded key, you will need to have your vehicle towed to a dealership. The key codes need to be erased from your vehicle and new coded keys will need to be programmed.
Replacing coded keys can be very costly. Store an extra programmed key away from the vehicle in a safe place to help prevent any inconveniences. Please visit an authorized dealer to purchase additional spare or replacement keys.
Programming spare keys
A maximum of eight keys can be coded to your vehicle. Only SecuriLock® keys can be used. To program a coded key yourself, you will need two previously programmed coded keys (keys that already operate your vehicle’s engine) and the new unprogrammed key(s) readily accessible for timely implementation of each step in the procedure.
If two previously programmed coded keys are not available, you must bring your vehicle to your dealership to have the spare coded key(s) programmed.
Please read and understand the entire procedure before you begin.
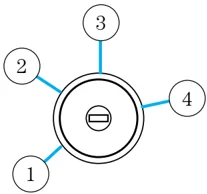
- Insert the first previously programmed coded key into the ignition and turn the ignition from the 1 (OFF/LOCK) position to the 3 (ON) position (maintain ignition in the 3 (ON) position for at least one second, but no more than ten seconds).
- Turn ignition from the 3 (ON) position back to the 1 (OFF/LOCK) position in order to remove the first coded key from the ignition.
- Within ten seconds of removing the first coded key, insert the second previously programmed coded key into the ignition and turn the ignition from the 1 (OFF/LOCK) position to the 3 (ON) position (maintain ignition in the 3 (ON) position for at least one second but no more than ten seconds).
- Turn the ignition from the 3 (ON) position back to the 1 (OFF/LOCK) position in order to remove the second coded key from the ignition.
- Within 10 seconds of removing the second coded key, insert the new unprogrammed key (new key/valet key) into the ignition and turn the
97
Locks and Security
ignition from the 1 (OFF/LOCK) position to the 3 (ON) position (maintain ignition in the 3 (ON) position for at least one second, but no more than ten seconds). This step will program your new key to a coded key.
- To program additional new unprogrammed key(s), repeat this procedure from Step 1.
If successful, the new coded key(s) will start the vehicle's engine and the theft indicator will illuminate for three seconds and then go out.
If not successful, the new coded key(s) will not start the vehicle's engine and the theft indicator will flash on and off and you may repeat Steps 1 through 5. If failure repeats, bring your vehicle to your dealership to have the new spare key(s) programmed.
98