Maintenance and Specifications
It should not be necessary to add any aftermarket products to your fuel tank if you continue to use high quality fuel of the recommended octane rating. Aftermarket products could cause damage to the fuel system. Repairs to correct the effects of using an aftermarket product in your fuel may not be covered by your warranty.
Many of the world's automakers approved the World-wide Fuel Charter that recommends gasoline specifications to provide improved performance and emission control system protection for your vehicle. Gasolines that meet the World-wide Fuel Charter should be used when available. Ask your fuel supplier about gasolines that meet the World-wide Fuel Charter.
Cleaner air
Ford endorses the use of reformulated "cleaner-burning" gasolines to improve air quality.
Running out of fuel
Avoid running out of fuel because this situation may have an adverse affect on powertrain components.
If you have run out of fuel:
- You may need to cycle the ignition from OFF to ON several times after refueling, to allow the fuel system to pump the fuel from the tank to the engine.
- Your Service engine soon indicator may come on. For more information on the Service engine soon indicator, refer to the Instrument cluster chapter.
Fuel Filter
For fuel filter replacement, see your dealer or a qualified service technician. Refer to the scheduled maintenance guide for the appropriate intervals for changing the fuel filter.
Replace the fuel filter with an authorized Motorcraft part. The customer warranty may be void for any damage to the fuel system if an authorized Motorcraft fuel filter is not used.
ESSENTIALS OF GOOD FUEL ECONOMY
Measuring techniques
Your best source of information about actual fuel economy is you, the driver. You must gather information as accurately and consistently as
249
Maintenance and Specifications
possible. Fuel expense, frequency of fill-ups or fuel gauge readings are NOT accurate as a measure of fuel economy. We do not recommend taking fuel economy measurements during the first 1,600 km (1,000 miles) of driving (engine break-in period). You will get a more accurate measurement after 3,000 km–5,000 km (2,000 miles-3,000 miles).
Filling the tank
The advertised fuel capacity of the fuel tank on your vehicle is equal to the rated refill capacity of the fuel tank as listed in the Refill capacities section of this chapter.
The advertised capacity is the amount of the indicated capacity and the empty reserve combined. Indicated capacity is the difference in the amount of fuel in a full tank and a tank when the fuel gauge indicates empty. Empty reserve is the small amount of fuel remaining in the fuel tank after the fuel gauge indicates empty.
The amount of usable fuel in the empty reserve varies and should not be relied upon to increase driving range. When refueling your vehicle after the fuel gauge indicates empty, you might not be able to refuel the full amount of the advertised capacity of the fuel tank due to the empty reserve still present in the tank.
For consistent results when filling the fuel tank:
• Turn the engine/ignition switch to the off position prior to refueling, an error in the reading may result if the engine is left running.
• Use the same filling rate setting (low — medium — high) each time the tank is filled.
• Allow no more than 3 automatic click-offs when filling.
• Always use fuel with the recommended octane rating.
• Use a known quality gasoline, preferably a national brand.
• Use the same side of the same pump and have the vehicle facing the same direction each time you fill up.
• Have the vehicle loading and distribution the same every time.
Your results will be most accurate if your filling method is consistent.
Calculating fuel economy
-
Fill the fuel tank completely and record the initial odometer reading (in kilometers or miles).
-
Each time you fill the tank, record the amount of fuel added (in liters or gallons).
250
Maintenance and Specifications
- After at least three to five tank fill-ups, fill the fuel tank and record the current odometer reading.
- Subtract your initial odometer reading from the current odometer reading.
- Follow one of the simple calculations in order to determine fuel economy: Calculation 1: Multiply liters used by 100, then divide by total kilometers traveled. Calculation 2: Divide total miles traveled by total gallons used.
Keep a record for at least one month and record the type of driving (city or highway). This will provide an accurate estimate of the vehicle's fuel economy under current driving conditions. Additionally, keeping records during summer and winter will show how temperature impacts fuel economy. In general, lower temperatures give lower fuel economy.
Driving style — good driving and fuel economy habits
Give consideration to the lists that follow and you may be able to change a number of variables and improve your fuel economy.
Habits
- Smooth, moderate operation can yield up to 10% savings in fuel.
- Steady speeds without stopping will usually give the best fuel economy.
- Idling for long periods of time (greater than one minute) may waste fuel.
- Anticipate stopping; slowing down may eliminate the need to stop.
- Sudden or hard accelerations may reduce fuel economy.
- Slow down gradually.
- Driving at reasonable speeds (traveling at 88 km/h [55 mph] uses 15% less fuel than traveling at 105 km/h [65 mph]).
- Revving the engine before turning it off may reduce fuel economy.
- Using the air conditioner or defroster may reduce fuel economy.
- You may want to turn off the speed control in hilly terrain if unnecessary shifting between third and fourth gear occurs. Unnecessary shifting of this type could result in reduced fuel economy.
- Warming up a vehicle on cold mornings is not required and may reduce fuel economy.
251
Maintenance and Specifications
- Resting your foot on the brake pedal while driving may reduce fuel economy.
- Combine errands and minimize stop-and-go driving.
Maintenance
- Keep tires properly inflated and use only recommended size.
- Operating a vehicle with the wheels out of alignment will reduce fuel economy.
- Use recommended engine oil. Refer to Lubricant specifications in this chapter.
- Perform all regularly scheduled maintenance items. Follow the recommended maintenance schedule and owner maintenance checks found in your vehicle scheduled maintenance guide.
Conditions
- Heavily loading a vehicle or towing a trailer may reduce fuel economy at any speed.
- Carrying unnecessary weight may reduce fuel economy (approximately 0.4 km/L [1 mpg] is lost for every 180 kg [400 lb] of weight carried).
- Adding certain accessories to your vehicle (for example bug deflectors, rollbars/light bars, running boards, ski/luggage racks) may reduce fuel economy.
- To maximize the fuel economy, drive with the tonneau cover installed (if equipped).
- Using fuel blended with alcohol may lower fuel economy.
- Fuel economy may decrease with lower temperatures during the first 12–16 km (8–10 miles) of driving.
- Driving on flat terrain offers improved fuel economy as compared to driving on hilly terrain.
- Transmissions give their best fuel economy when operated in the top cruise gear and with steady pressure on the gas pedal.
- Four-wheel-drive operation (if equipped) is less fuel efficient than two-wheel-drive operation.
- Close windows for high speed driving.
EPA window sticker
Every new vehicle should have the EPA window sticker. Contact your dealer if the window sticker is not supplied with your vehicle. The EPA window sticker should be your guide for the fuel economy comparisons with other vehicles.
252
Maintenance and Specifications
It is important to note the box in the lower left corner of the window sticker. These numbers represent the Range of L/100 km (MPG) expected on the vehicle under optimum conditions. Your fuel economy may vary depending upon the method of operation and conditions.
EMISSION CONTROL SYSTEM
Your vehicle is equipped with various emission control components and a catalytic converter which will enable your vehicle to comply with applicable exhaust emission standards. To make sure that the catalytic converter and other emission control components continue to work properly:
• Use only the specified fuel listed.
• Avoid running out of fuel.
• Do not turn off the ignition while your vehicle is moving, especially at high speeds.
• Have the items listed in your Scheduled Maintenance Guide performed according to the specified schedule.
The scheduled maintenance items listed in the Scheduled Maintenance Guide are essential to the life and performance of your vehicle and to its emissions system.
If other than Ford, Motorcraft or Ford-authorized parts are used for maintenance replacements or for service of components affecting emission control, such non-Ford parts should be equivalent to genuine Ford Motor Company parts in performance and durability.
Do not park, idle, or drive your vehicle in dry grass or other dry ground cover. The emission system heats up the engine compartment and exhaust system, which can start a fire.
Illumination of the Service engine soon light, charging system warning light or the temperature warning light, fluid leaks, strange odors, smoke or loss of engine power, could indicate that the emission control system is not working properly.
Exhaust leaks may result in entry of harmful and potentially lethal fumes into the passenger compartment.
Do not make any unauthorized changes to your vehicle or engine. By law, vehicle owners and anyone who manufactures, repairs, services, sells, leases, trades vehicles, or supervises a fleet of vehicles are not
253
Maintenance and Specifications
permitted to intentionally remove an emission control device or prevent it from working. Information about your vehicle’s emission system is on the Vehicle Emission Control Information Decal located on or near the engine. This decal identifies engine displacement and gives some tune up specifications.
Please consult your Warranty Guide for complete emission warranty information.
On board diagnostics (OBD-II)
Your vehicle is equipped with a computer that monitors the engine’s emission control system. This system is commonly known as the On Board Diagnostics System (OBD-II). This OBD-II system protects the environment by ensuring that your vehicle continues to meet government emission standards. The OBD-II system also assists the service technician in properly servicing your vehicle. When the Check engine/Service engine soon light illuminates, the OBD-II system has detected a malfunction. Temporary malfunctions may cause your Check engine/Service engine soon light to illuminate. Examples are:
- The vehicle has run out of fuel. (The engine may misfire or run poorly.)
- Poor fuel quality or water in the fuel.
- The fuel cap may not have been securely tightened.
These temporary malfunctions can be corrected by filling the fuel tank with good quality fuel and/or properly tightening the fuel cap. After three driving cycles without these or any other temporary malfunctions present, the Check engine/Service engine soon light should turn off. (A driving cycle consists of a cold engine startup followed by mixed city/highway driving.) No additional vehicle service is required.
If the Check engine/Service engine soon light remains on, have your vehicle serviced at the first available opportunity.
Readiness for Inspection/Maintenance (I/M) testing
In some localities, it may be a legal requirement to pass an I/M test of the on-board diagnostics system. If your Service engine soon light is on, refer to the description in the Warning lights and chimes section of the Instrument Cluster chapter. Your vehicle may not pass the I/M test with the Service engine soon light on.
If the vehicle’s powertrain system or its battery has just been serviced, the on-board diagnostics system is reset to a “not ready for I/M test”
254
Maintenance and Specifications
condition. To ready the on-board diagnostics system for I/M testing, a minimum of 30 minutes of city and highway driving is necessary as described below:
- First, at least 10 minutes of driving on an expressway or highway.
- Next, at least 20 minutes driving in stop-and-go, city-type traffic with at least four idle periods.
Allow the vehicle to sit for at least eight hours without starting the engine. Then, start the engine and complete the above driving cycle. The engine must warm up to its normal operating temperature. Once started, do not turn off the engine until the above driving cycle is complete.
CHECKING AND ADDING POWER STEERING FLUID
Check the power steering fluid. Refer to the scheduled maintenance guide for the service interval schedules. If adding fluid is necessary, use only MERCON® ATF.
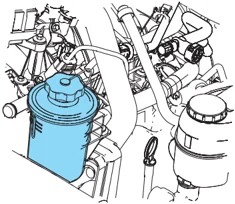
- Start the engine and let it run until it reaches normal operating temperature (the engine coolant temperature gauge indicator will be near the center of the normal area between H and C).
- While the engine idles, turn the steering wheel left and right several times.
- Turn the engine off.
- Check the fluid level in the reservoir. It should be between the MIN and MAX lines. Do not add fluid if the level is in this range.
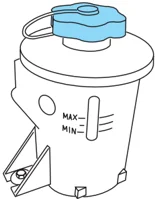
- If the fluid is low, add fluid in small amounts, continuously checking the level until it reaches the range between the MIN and MAX lines. Be sure to put the cap back on the reservoir.
255
Maintenance and Specifications
BRAKE FLUID RESERVOIR
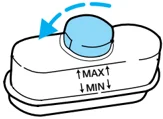
The fluid level will drop slowly as the brakes wear, and will rise when the brake components are replaced. Fluid levels between the “MIN” and “MAX” lines are within the normal operating range; there is no need to add fluid. If the fluid levels are outside of the normal operating range the performance of your brake system could be compromised; seek service from your dealer immediately.

TRANSMISSION FLUID
Checking automatic transmission fluid (if equipped)
Refer to your Scheduled Maintenance Guide for scheduled intervals for fluid checks and changes. Your transmission does not consume fluid. However, the fluid level should be checked if the transmission is not working properly, i.e., if the transmission slips or shifts slowly or if you notice some sign of fluid leakage.
Automatic transmission fluid expands when warmed. To obtain an accurate fluid check, drive the vehicle until it is at normal operating temperature (approximately 30 km [20 miles]). If your vehicle has been operated for an extended period at high speeds, in city traffic during hot weather or pulling a trailer, the vehicle should be turned off for about 30 minutes to allow fluid to cool before checking.
-
Drive the vehicle 30 km (20 miles) or until it reaches normal operating temperature.
-
Park the vehicle on a level surface and engage the parking brake.
-
With the parking brake engaged and your foot on the brake pedal, start the engine and move the gearshift lever through all of the gear ranges. Allow sufficient time for each gear to engage.
-
Latch the gearshift lever in P (Park) and leave the engine running.
-
Remove the dipstick, wiping it clean with a clean, dry lint free rag. If necessary, refer to Identifying components in the engine compartment in this chapter for the location of the dipstick.
-
Install the dipstick making sure it is fully seated in the filler tube.
-
Remove the dipstick and inspect the fluid level. The fluid should be in the designated area for normal operating temperature or ambient temperature.
256
Maintenance and Specifications
Low fluid level Do not drive the vehicle if the fluid level is at the bottom of the dipstick and the ambient temperature is above 10°C (50°F).
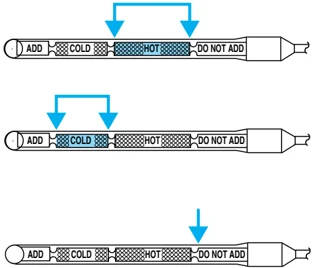
Correct fluid level The transmission fluid should be checked at normal operating temperature 66°C-77°C (150°F-170°F) on a level surface. The normal operating temperature can be reached after approximately 30 km (20 miles) of driving.
You can check the fluid without driving if the ambient temperature is above 10°C (50°F). However, if fluid is added at this time, an overfill condition could result when the vehicle reaches normal operating temperature.
The transmission fluid should be in this range if at normal operating temperature (66°C-77°C [150°F-170°F]).

The transmission fluid should be in this range if at ambient temperature (10°C-35°C [50°F-95°F]).
High fluid level Fluid levels above the safe range may result in transmission failure. An overfill condition of transmission fluid may cause shift and/or engagement concerns and/or possible damage.
High fluid levels can be caused by an overheating condition.
Adjusting automatic transmission fluid levels Before adding any fluid, make sure the correct type is used. The type of fluid used is normally indicated on the dipstick and also in the Lubricant specifications section in this chapter.
Use of a non-approved automatic transmission fluid may cause internal transmission component damage.
If necessary, add fluid in 250 ml (1/2 pint) increments through the filler tube until the level is correct.
257
Maintenance and Specifications
If an overfill occurs, excess fluid should be removed by a qualified technician.
()An overfill condition of transmission fluid may cause shift and/or engagement concerns and/or possible damage.
Do not use supplemental transmission fluid additives, treatments or cleaning agents. The use of these materials may affect transmission operation and result in damage to internal transmission components.
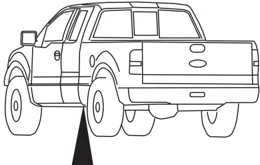
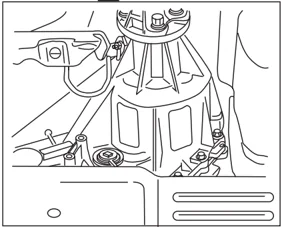
Checking and adding transfer case fluid (if equipped)
-
Clean the filler plug.
-
Remove the filler plug and inspect the fluid level.

258
Maintenance and Specifications
- Add only enough fluid through the filler opening so that the fluid level is at the bottom of the opening.
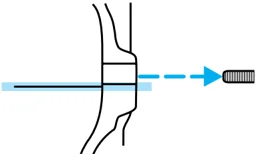
Use only fluid that meets Ford specifications. Refer to Lubricant specifications in this chapter.
DRIVELINE UNIVERSAL JOINT AND SLIP YOKE
Your vehicle may be equipped with universal joints that require lubrication. Refer to the Scheduled Maintenance Guide for maintenance intervals. If the original universal joints are replaced with universal joints equipped with grease fittings, lubrication will also be necessary.
AIR FILTER MAINTENANCE
Refer to the scheduled maintenance guide for the appropriate intervals for changing the air filter element.
When changing the air filter element, use only the Motorcraft air filter element listed. Refer to Motorcraft part numbers in this chapter.
Note: Do not start your engine with the air cleaner removed and do not remove it while the engine is running.
259
Maintenance and Specifications
Changing the air filter element
- 4.6L Engine
- Loosen the clamp that secures the air filter element in place.
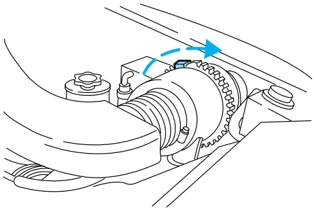
- Carefully separate the two halves of the air filter housing.
- Remove the air filter element from the open end of the air filter housing.
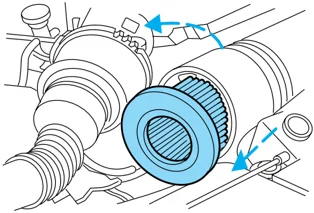
- Install a new air filter element.
- Reassemble the two halves of the air filter housing, aligning the notch and slot found on the top of each half. Secure the clamp, making sure not to crimp the air filter edges between the two halves of the air filter housing. This could cause filter damage and allow unmetered air to enter the engine if not properly seated.
- 5.4L Engine
260
Maintenance and Specifications
-
Release two retainer clamps.
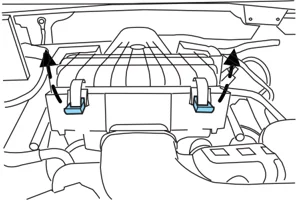
-
Pull air filter tray assembly out toward front of vehicle and lift air filter element up and out of housing.
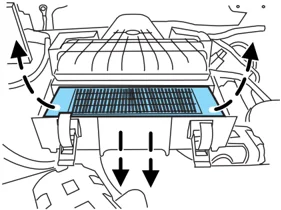
The air filter box needs to be free of any debris before installing a new air filter.
- Install a new air filter element into the tray assembly.
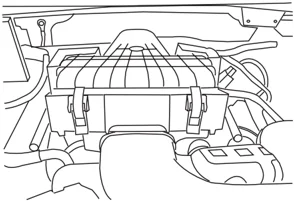
- Return air filter tray to original position by pressing firmly on the handle until all rearward movement stops and secure the two clamps.
261
Maintenance and Specifications
INFORMATION ABOUT UNIFORM TIRE QUALITY GRADING
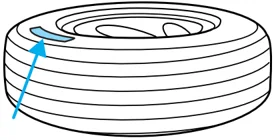
New vehicles are fitted with tires that have a rating on them called Tire Quality Grades. The Quality grades can be found where applicable on the tire sidewall between tread shoulder and maximum section width. For example:
- Treadwear 200 Traction AA Temperature A
These Tire Quality Grades are determined by standards that the United States Department of Transportation has set.
Tire Quality Grades apply to new pneumatic tires for use on passenger cars. They do not apply to deep tread, winter-type snow tires, space-saver or temporary use spare tires, tires with nominal rim diameters of 10 to 12 inches or limited production tires as defined in Title 49 Code of Federal Regulations Part 575.104(c)(2).
U.S. Department of Transportation-Tire quality grades: The U.S. Department of Transportation requires Ford to give you the following information about tire grades exactly as the government has written it.
Treadwear
The treadwear grade is a comparative rating based on the wear rate of the tire when tested under controlled conditions on a specified government test course. For example, a tire graded 150 would wear one and one-half (1 1/2) times as well on the government course as a tire graded 100. The relative performance of tires depends upon the actual conditions of their use, however, and may depart significantly from the norm due to variations in driving habits, service practices, and differences in road characteristics and climate.
Traction AA A B C
The traction grades, from highest to lowest are AA, A, B, and C. The grades represent the tire's ability to stop on wet pavement as measured under controlled conditions on specified government test surfaces of asphalt and concrete. A tire marked C may have poor traction performance.
262
Maintenance and Specifications
The traction grade assigned to this tire is based on straight-ahead braking traction tests, and does not include acceleration, cornering, hydroplaning or peak traction characteristics.
Temperature A B C
The temperature grades are A (the highest), B and C, representing the tire's resistance to the generation of heat and its ability to dissipate heat when tested under controlled conditions on a specified indoor laboratory test wheel. Sustained high temperature can cause the material of the tire to degenerate and reduce tire life, and excessive temperature can lead to sudden tire failure. The grade C corresponds to a level of performance which all passenger car tires must meet under the Federal Motor Vehicle Safety Standard No. 109. Grades B and A represent higher levels of performance on the laboratory test wheel than the minimum required by law.
The temperature grade for this tire is established for a tire that is properly inflated and not overloaded. Excessive speed, underinflation, or excessive loading, either separately or in combination, can cause heat buildup and possible tire failure.
TIRES
Tires are designed to give many thousands of miles of service, but they must be maintained in order to get the maximum benefit from them.
Glossary of tire terminology
- Tire label: A label showing the OE (Original Equipment) tire sizes, recommended inflation pressure and the maximum weight the vehicle can carry.
- Tire Identification Number (TIN): A number on the sidewall of each tire providing information about the tire brand and manufacturing plant, tire size and date of manufacture.
- Inflation pressure: A measure of the amount of air in a tire.
- Standard load: A class of P-metric or Metric tires designed to carry a maximum load at 35 psi [37 psi (2.5 bar) for Metric tires]. Increasing the inflation pressure beyond this pressure will not increase the tire's load carrying capability.
- Extra load: A class of P-metric or Metric tires designed to carry a heavier maximum load at 41 psi [43 psi (2.9 bar) for Metric tires].
263
Maintenance and Specifications
Increasing the inflation pressure beyond this pressure will not increase the tire’s load carrying capability.
- kPa: Kilopascal, a metric unit of air pressure.
- PSI: Pounds per square inch, a standard unit of air pressure.
- B-pillar: The structural member at the side of the vehicle behind the front door.
- Bead area of the tire: Area of the tire next to the rim.
- Sidewall of the tire: Area between the bead area and the tread.
- Tread area of the tire: Area of the perimeter of the tire that contacts the road when mounted on the vehicle.
- Rim: The metal support (wheel) for a tire or a tire and tube assembly upon which the tire beads are seated.
I NFORMATION CONTAINED ON THE TIRE SIDEWALL
Federal law requires tire manufacturers to place standardized information on the sidewall of all tires. This information identifies and describes the fundamental characteristics of the tire and also provides a U.S. DOT Tire Identification Number for safety standard certification and in case of a recall.
Information on “P” type tires
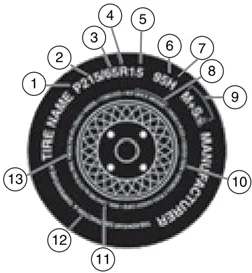
P215/65R15 95H is an example of a tire size, load index and speed rating. The definitions of these items are listed below. (Note that the tire size, load index and speed rating for your vehicle may be different from this example.)
- P: Indicates a tire, designated by the Tire and Rim Association (T&RA), that may be used for service on cars, SUVs, minivans and light trucks.
Note: If your tire size does not begin with a letter this may mean it is designated by either ETRTO (European Tire and Rim Technical Organization) or JATMA (Japan Tire Manufacturing Association).
- 215: Indicates the nominal width of the tire in millimeters from sidewall edge to sidewall edge. In general, the larger the number, the wider the tire.
264
Maintenance and Specifications
-
65: Indicates the aspect ratio which gives the tire’s ratio of height to width.
-
R: Indicates a “radial” type tire.
-
15: Indicates the wheel or rim diameter in inches. If you change your wheel size, you will have to purchase new tires to match the new wheel diameter.
-
95: Indicates the tire’s load index. It is an index that relates to how much weight a tire can carry. You may find this information in your owner’s guide. If not, contact a local tire dealer.
Note: You may not find this information on all tires because it is not required by federal law.
- H: Indicates the tire’s speed rating. The speed rating denotes the speed at which a tire is designed to be driven for extended periods of time under a standard condition of load and inflation pressure. The tires on your vehicle may operate at different conditions for load and inflation pressure. These speed ratings may need to be adjusted for the difference in conditions. The ratings range from 99 mph (159 km/h) to 186 mph (299 km/h). These ratings are listed in the following chart.
Note: You may not find this information on all tires because it is not required by federal law.
| Letter rating | Speed rating - mph (km/h) |
|---|---|
| Q | 99 mph (159 km/h) |
| R | 106 mph (171 km/h) |
| S | 112 mph (180 km/h) |
| T | 118 mph (190 km/h) |
| U | 124 mph (200 km/h) |
| H | 130 mph (210 km/h) |
| V | 149 mph (240 km/h) |
| W | 168 mph (270 km/h) |
| Y | 186 mph (299 km/h) |
Note: For tires with a maximum speed capability over 149 mph (240 km/h), tire manufacturers sometimes use the letters ZR. For those with a maximum speed capability over 186 mph (299 km/h), tire manufacturers always use the letters ZR.
265
Maintenance and Specifications
-
U.S. DOT Tire Identification Number (TIN): This begins with the letters “DOT” and indicates that the tire meets all federal standards. The next two numbers or letters are the plant code designating where it was manufactured, the next two are the tire size code and the last four numbers represent the week and year the tire was built. For example, the numbers 317 mean the 31st week of 1997. After 2000 the numbers go to four digits. For example, 2501 means the 25th week of 2001. The numbers in between are identification codes used for traceability. This information is used to contact customers if a tire defect requires a recall.
-
M+S or M/S: Mud and Snow. or AT: All Terrain. or AS: All Season.
-
Tire Ply Composition and Material Used: Indicates the number of plies or the number of layers of rubber-coated fabric in the tire tread and sidewall. Tire manufacturers also must indicate the ply materials in the tire and the sidewall, which include steel, nylon, polyester, and others.
-
Maximum Load: Indicates the maximum load in kilograms and pounds that can be carried by the tire. Refer to the tire label or the safety certification label, which is located on the B-Pillar or the edge of the driver’s door, for the correct tire pressure for your vehicle
-
Treadwear, Traction and Temperature Grades
- Treadwear: The treadwear grade is a comparative rating based on the wear rate of the tire when tested under controlled conditions on a specified government test course. For example, a tire graded 150 would wear one and one-half (1-1/2) times as well on the government course as a tire graded 100.
- Traction: The traction grades, from highest to lowest are AA, A, B, and C. The grades represent the tire’s ability to stop on wet pavement as measured under controlled conditions on specified government test surfaces of asphalt and concrete. A tire marked C may have poor traction performance.
- Temperature: The temperature grades are A (the highest), B and C, representing the tire’s resistance to the generation of heat and its ability to dissipate heat when tested under controlled conditions on a specified indoor laboratory test wheel.
- Maximum Permissible Inflation Pressure: Indicates the tire manufacturers’ maximum permissible pressure and/or the pressure at which the maximum load can be carried by the tire. This pressure is normally higher than the manufacturer’s recommended cold inflation pressure which can be found on either the tire label or certification label
266
Maintenance and Specifications
which is located on the B-Pillar or the edge of the driver’s door. The cold inflation pressure should never be set lower than the recommended pressure on the vehicle label.
The tire suppliers may have additional markings, notes or warnings such as standard load, radial tubeless, etc.
Additional information contained on the tire sidewall for “LT” type tires
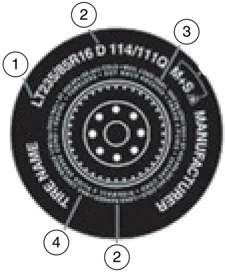
“LT” type tires have some additional information beyond those of “P” type tires; these differences are described below:
- LT: Indicates a tire, designated by the Tire and Rim Association (T&RA), that is intended for service on light trucks.
- Load Range/Load Inflation Limits: Indicates the tire’s load-carrying capabilities and its inflation limits.
- Maximum Load Dual lbs. (kg) at psi (kPa) cold: Indicates the maximum load and tire pressure when the tire is used as a dual; defined as four tires on the rear axle (a total of six or more tires on the vehicle).
- Maximum Load Single lbs. (kg) at psi (kPa) cold: Indicates the maximum load and tire pressure when the tire is used as a single; defined as two tires (total) on the rear axle.
267
Maintenance and Specifications
Information on “T” type tires
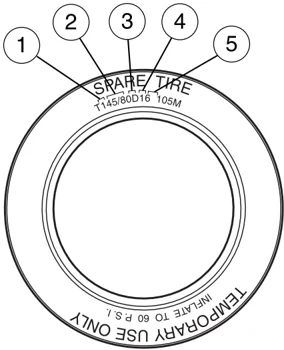
T145/80D16 is an example of a tire size.
Note: The temporary tire size for your vehicle may be different from this example.
- T: Indicates a type of tire, designated by the Tire and Rim Association (T&RA), that is intended for temporary service on cars, SUVs, minivans and light trucks.
- 145: Indicates the nominal width of the tire in millimeters from sidewall edge to sidewall edge. In general, the larger the number, the wider the tire.
- 80: Indicates the aspect ratio which gives the tire’s ratio of height to width. Numbers of 70 or lower indicate a short sidewall.
- D: Indicates a “diagonal” type tire. R: Indicates a “radial” type tire.
- 16: Indicates the wheel or rim diameter in inches. If you change your wheel size, you will have to purchase new tires to match the new wheel diameter.
Location of the tire label
You will find a tire label containing tire inflation pressure by tire size and other important information located on the B-Pillar or the edge of the driver’s door.
TIRE CARE
Improper or inadequate vehicle maintenance can also cause tires to wear abnormally. Here are some of the important maintenance items:
Inflating your tires
Use a tire gauge to check the tire inflation pressure, including the spare, at least monthly and before long trips. You are strongly urged to buy a reliable tire pressure gauge, as automatic service station gauges may be
268
Maintenance and Specifications
inaccurate. Ford recommends the use of a digital or dial type tire pressure gauge rather than a stick type tire pressure gauge. Use the recommended cold inflation pressure for optimum tire performance and wear. Under-inflation or over-inflation may cause uneven treadwear patterns.
Under-inflation is the most common cause of tire failures and may result in severe tire cracking, tread separation or "blowout", with unexpected loss of vehicle control and increased risk of injury. Under-inflation increases sidewall flexing and rolling resistance, resulting in heat buildup and internal damage to the tire. It also may result in unnecessary tire stress, irregular wear, loss of vehicle control and accidents. A tire can lose up to half of its air pressure and not appear to be flat!
When weather temperature changes occur, tire inflation pressures also change. A 10° F (6° C) temperature drop can cause a corresponding drop of 1 psi (7 kPa) in inflation pressure. Check your tire pressures frequently and adjust them to the proper pressure which can be found on the tire label or certification label.
If you are checking tire pressure when the tire is hot, (i.e. driven more than 1 mile [1.6 km]), never "bleed" or reduce air pressure. The tires are hot from driving and it is normal for pressures to increase above recommended cold pressures. A hot tire at or below recommended cold inflation pressure could be significantly under-inflated.
To check the pressure in your tire(s):
- Make sure the tires are cool, meaning they are not hot from driving even a mile.
Note: If you have to drive a distance to get air for your tire(s), check and record the tire pressure first and add the appropriate air pressure when you get to the pump. It is normal for tires to heat up and the air pressure inside to go up as you drive. Never "bleed" or reduce air pressure when tires are hot.
-
Remove the cap from the valve on one tire, then firmly press the tire gauge onto the valve and measure the pressure.
-
Add enough air to reach the recommended air pressure
Note: If you overfill the tire, release air by pushing on the metal stem in the center of the valve. Then recheck the pressure with your tire gauge.
- Replace the valve cap.
269
Maintenance and Specifications
-
Repeat this procedure for each tire, including the spare. Note: Some spare tires require higher inflation pressure than the other tires. Check the tire label on the B pillar or the edge of the driver's door for the recommended spare tire pressure.
-
Visually inspect the tires to make sure there are no nails or other objects embedded that could poke a hole in the tire and cause an air leak.
-
Check the sidewalls to make sure there are no gouges, cuts or bulges.
Tire and wheel alignment
A bad jolt from hitting a curb or pothole can cause the front end of your vehicle to become misaligned or cause damage to your tires. If your vehicle seems to pull to one side when you're driving, the wheels may be out of alignment. Have a qualified technician at a Ford or Lincoln/Mercury dealer check the wheel alignment periodically.
Wheel misalignment in the front or the rear can cause uneven and rapid treadwear of your tires and should be corrected by a qualified technician at a Ford or Lincoln/Mercury dealer. Front wheel drive (FWD) vehicles and those with an independent rear suspension (if equipped) may require alignment of all four wheels.
The tires should also be balanced periodically. An unbalanced tire and wheel assembly may result in irregular tire wear.
Tire rotation
Rotating your tires at the recommended interval (as indicated in the Scheduled Maintenance Guide that comes with your vehicle) will help your tires wear more evenly, providing better tire performance and longer tire life. Unless otherwise specified, rotate the tires approximately every 5,000 miles (8,000 km).
270
Maintenance and Specifications
• Front Wheel Drive (FWD) vehicles (front tires at top of diagram)
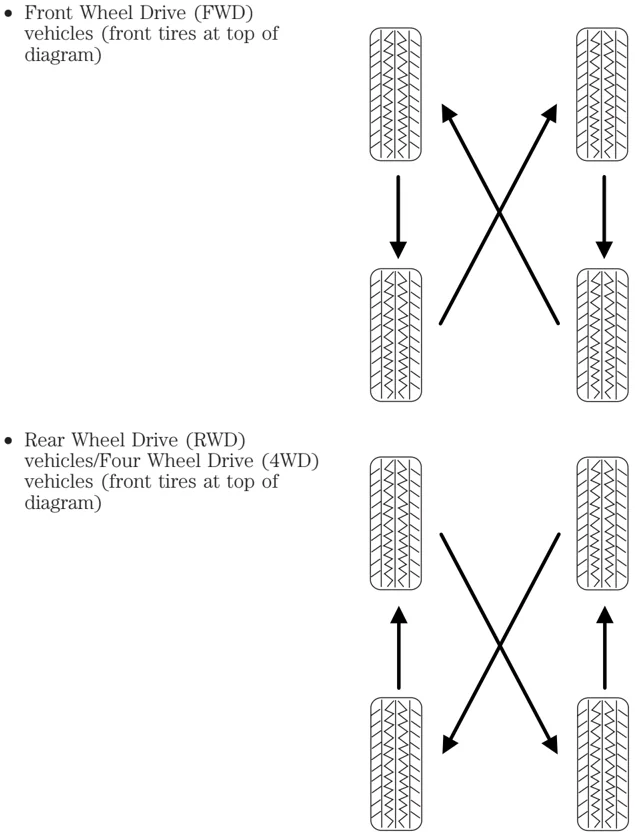
• Rear Wheel Drive (RWD) vehicles/Four Wheel Drive (4WD) vehicles (front tires at top of diagram)
Sometimes irregular tire wear can be corrected by rotating the tires.
271
Maintenance and Specifications
Note: If your tires show uneven wear ask a qualified technician at a Ford or Lincoln/Mercury dealership to check for and correct any wheel misalignment, tire imbalance or mechanical problem involved before tire rotation.
Note: Your vehicle may be equipped with a dissimilar spare tire/wheel. A dissimilar spare tire/wheel is defined as a spare tire and/or wheel that is different in brand, size or appearance from the road tires and wheels. If you have a dissimilar spare tire/wheel it is intended for temporary use only and should not be used in a tire rotation.
Note: After having your tires rotated, inflation pressure must be checked and adjusted to the vehicle requirements.
Tire wear
Measure and inspect the tire tread on all your tires periodically. Advanced and unusual tire wear can reduce the ability of tread to grip the road in adverse (wet, snowy, etc.) conditions. Visually check your tires for uneven wear, looking for high and low areas or unusually smooth areas. Also check for signs of tire damage.
When the tread is worn down to 1/16th of an inch (2 mm), tires must be replaced to prevent your vehicle from skidding and hydroplaning. Built-in treadwear indicators, or “wear bars”, which look like narrow strips of smooth rubber across the tread will appear on the tire when the tread is worn down to 1/16th of an inch (2 mm). When you see these “wear bars”, the tire is worn out and should be replaced.
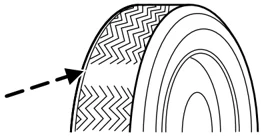
Inspect your tires frequently for any of the following conditions and replace them if one or more of the following conditions exist:
• Fabric showing through the tire rubber
• Bulges in the tread or sidewalls
• Cracks or cuts on the sidewalls
• Cracks in the tread groove
• Impact damage resulting from use
• Separation in the tread
• Separation in the sidewall
• Severe abrasion on the sidewall
272
Maintenance and Specifications
If your vehicle has a leak in the exhaust system, a road tire or the spare tire may be exposed to hot exhaust temperatures requiring the tire to be replaced.
Tire Replacement Requirements
Your vehicle is equipped with tires designed to provide a safe ride and handling capability.
Only use replacement tires and wheels that are the same size and type (such as P-metric versus LT-metric or all-season versus all-terrain) as those originally provided by Ford. Use of any tire or wheel not recommended by Ford can affect the safety and performance of your vehicle, which could result in an increased risk of loss of vehicle control, vehicle rollover, personal injury and death. Additionally the use of non-recommended tires and wheels could cause steering, suspension, axle or transfer case/power transfer unit failure. If you have questions regarding tire replacement, see an authorized Ford or Lincoln-Mercury dealer.
Make sure all tires and wheels on the vehicle are of the same size, type, tread design, brand, load-carrying capacity and speed rating because it can affect the safety and performance of your vehicle, which could result in an increased risk of loss of vehicle control, vehicle rollover, personal injury and death.
You should replace the spare tire when you replace the other road tires due to the aging of the spare tire.
Safety practices
Driving habits have a great deal to do with your tire mileage and safety.
• Observe posted speed limits
• Avoid fast starts, stops and turns
• Avoid potholes and objects on the road
• Do not run over curbs or hit the tire against a curb when parking
If your vehicle is stuck in snow, mud, sand, etc., do not rapidly spin the tires; spinning the tires can tear the tire and cause an explosion. A tire can explode in as little as three to five seconds.
Tire explosions can cause death, personal injury or property damage. Do not allow anyone to stand near, directly ahead or behind the spinning tire.
273